你都用 Python 来做什么?

关于Python有一句名言:不要重复造轮子。
但是问题有三个:
1、你不知道已经有哪些轮子已经造好了,哪个适合你用。有名有姓的的著名轮子就400多个,更别说没名没姓自己在制造中的轮子。
2、确实没重复造轮子,但是在重复制造汽车。包括好多大神写的好几百行代码,为的是解决一个Excel本身就有的成熟功能。
3、很多人是用来抓图,数据,抓点图片、视频、天气预报自娱自乐一下,然后呢?抓到大数据以后做什么用呢?比如某某啤酒卖的快,然后呢?比如某某电影票房多,然后呢?
我认为用Python应该能分析出来,这个现实的世界属于政治家,商业精英,艺术家,农民,而绝对不会属于Python程序员,纵使代码再精彩也没什么用。
以下是经过Python3.6.4调试通过的代码,与大家分享:
- 1、抓取图片
- 2、听两个聊天机器人互相聊天(图灵、青云、小i)
- 3、AI分析唐诗的作者是李白还是杜
- 4、彩票随机生成35选7
- 5、自动写检讨书
- 6、屏幕录相机
- 7、制作Gif动图
- 8、语音识别成文
- 9、VB6与Python通过COM组件联合编程
- 10、Python与小米米家、YeeLight的互动
- 11、摄像头拍照,并感情分析
- 12、朗读PPT,自动帮你讲课
- 13、最简单的浏览器
1、抓取图片,只用30行代码:
import re
from selenium import webdriver
import time
import urllib.request

driver = webdriver.Chrome()
driver.maximize_window()
driver.get("https://www.某某乎.com/question/29134042")
i = 0
while i < 10:
    driver.execute_script("window.scrollTo(0, document.body.scrollHeight);")
    time.sleep(2)
    try:
        driver.find_element_by_css_selector('button.QuestionMainAction').click()
        print("page" + str(i))
        time.sleep(1)
    except:
        break
result_raw = driver.page_source
content_list = re.findall("img src=\"(.+?)\" ", str(result_raw))
n = 0
while n < len(content_list):
    i = time.time()
    local = (r"%s.jpg" % (i))
    urllib.request.urlretrieve(content_list[n], local)
    print("编号:" + str(i))
    n = n + 1
2、没事闲的时候,听两个聊天机器人互相聊天:
from time import sleep
import requests
s = input("请主人输入话题:")
while True:
    resp = requests.post("http://www.tuling123.com/openapi/api",data={"key": "4fede3c4384846b9a7d0456a5e1e2943", "info": s, })
    resp = resp.json()
    sleep(1)
    print('小鱼:', resp['text'])
    s = resp['text']
    resp = requests.get("http://api.qingyunke.com/api.php", {'key': 'free', 'appid': 0, 'msg': s})
    resp.encoding = 'utf8'
    resp = resp.json()
    sleep(1)
    print('菲菲:', resp['content'])
网上还有一个据说智商比较高的小i机器人,用爬虫的功能来实现一下:
import urllib.request
import re

while True:
    x = input("主人:")
    x = urllib.parse.quote(x)
    link = urllib.request.urlopen(
        "http://nlp.xiaoi.com/robot/webrobot?&callback=__webrobot_processMsg&data=%7B%22sessionId%22%3A%22ff725c236e5245a3ac825b2dd88a7501%22%2C%22robotId%22%3A%22webbot%22%2C%22userId%22%3A%227cd29df3450745fbbdcf1a462e6c58e6%22%2C%22body%22%3A%7B%22content%22%3A%22" + x + "%22%7D%2C%22type%22%3A%22txt%22%7D")
    html_doc = link.read().decode()
    reply_list = re.findall(r'\"content\":\"(.+?)\\r\\n\"', html_doc)
    print("小i:" + reply_list[-1])
3、分析唐诗的作者是李白还是杜甫:
import jieba
from nltk.classify import NaiveBayesClassifier

# 需要提前把李白的诗收集一下,放在libai.txt文本中。
text1 = open(r"libai.txt", "rb").read()
list1 = jieba.cut(text1)
result1 = " ".join(list1)
# 需要提前把杜甫的诗收集一下,放在dufu.txt文本中。
text2 = open(r"dufu.txt", "rb").read()
list2 = jieba.cut(text2)
result2 = " ".join(list2)

# 数据准备
libai = result1
dufu = result2


# 特征提取
def word_feats(words):
    return dict([(word, True) for word in words])


libai_features = [(word_feats(lb), 'lb') for lb in libai]
dufu_features = [(word_feats(df), 'df') for df in dufu]
train_set = libai_features + dufu_features
# 训练决策
classifier = NaiveBayesClassifier.train(train_set)

# 分析测试
sentence = input("请输入一句你喜欢的诗:")
print("\n")
seg_list = jieba.cut(sentence)
result1 = " ".join(seg_list)
words = result1.split(" ")

# 统计结果


lb = 0
df = 0
for word in words:
    classResult = classifier.classify(word_feats(word))
    if classResult == 'lb':
        lb = lb + 1
    if classResult == 'df':
        df = df + 1

# 呈现比例
x = float(str(float(lb) / len(words)))
y = float(str(float(df) / len(words)))
print('李白的可能性:%.2f%%' % (x * 100))
print('杜甫的可能性:%.2f%%' % (y * 100))
4、彩票随机生成35选7:
import random

temp = [i + 1 for i in range(35)]
random.shuffle(temp)
i = 0
list = []
while i < 7:
    list.append(temp[i])
    i = i + 1
list.sort()
print('\033[0;31;;1m')
print(*list[0:6], end="")
print('\033[0;34;;1m', end=" ")
print(list[-1])
5、自动写检讨书:
import random
import xlrd

ExcelFile = xlrd.open_workbook(r'test.xlsx')
sheet = ExcelFile.sheet_by_name('Sheet1')
i = []
x = input("请输入具体事件:")
y = int(input("老师要求的字数:"))
while len(str(i)) < y * 1.2:
    s = random.randint(1, 60)
    rows = sheet.row_values(s)
    i.append(*rows)
print(" "*8+"检讨书"+"\n"+"老师:")
print("我不应该" + str(x)+",", *i)
print("再次请老师原谅!")
以下是样稿:
请输入具体事件:抽烟
老师要求的字数:200
        检讨书
老师:
我不应该抽烟, 学校一开学就三令五申,一再强调校规校纪,提醒学生不要违反校规,可我却没有把学校和老师的话放在心上,没有重视老师说的话,没有重视学校颁布的重要事项,当成了耳旁风,这些都是不应该的。 同时也真诚地希望老师能继续关心和支持我,并却对我的问题酌情处理。 无论在学习还是在别的方面我都会用校规来严格要求自己,我会把握这次机会。 但事实证明,仅仅是热情投入、刻苦努力、钻研学业是不够的,还要有清醒的政治头脑、大局意识和纪律观念,否则就会在学习上迷失方向,使国家和学校受损失。
再次请老师原谅!
6、屏幕录相机,抓屏软件:
from time import sleep
from PIL import ImageGrab

m = int(input("请输入想抓屏几分钟:"))
m = m * 60
n = 1
while n < m:
    sleep(0.02)
    im = ImageGrab.grab()
    local = (r"%s.jpg" % (n))
    im.save(local, 'jpeg')
    n = n + 1
7、制作Gif动图:
from PIL import Image

im = Image.open("1.jpg")
images = []
images.append(Image.open('2.jpg'))
images.append(Image.open('3.jpg'))
im.save('gif.gif', save_all=True, append_images=images, loop=1, duration=1, comment=b"aaabb")
8、语音识别成文字
语音识别文字核心代码不多,利用百度在线语音API。
可以用在多种场景,比如语音录入,练习简单发音等。
# -*- coding: utf-8 -*-#
from aip import AipSpeech
import speech_recognition as sr
import os

# 生成音频文件
def my_record(rate=16000):
    r = sr.Recognizer()
    with sr.Microphone(sample_rate=rate) as source:
        print("请说话")
        audio = r.listen(source)
    with open("audio.wav", "wb") as f:
        f.write(audio.get_wav_data())

# 2、音频文件转文字

APP_ID = '这三个参数要,自己去百度申请'
API_KEY = '这三个参数要,自己去百度申请'
SECRET_KEY = '这三个参数要,自己去百度申请'
client = AipSpeech(APP_ID, API_KEY, SECRET_KEY)
path = 'audio.wav'

def listen():
    # 读取录音文件
    with open(path, 'rb') as fp:
        voices = fp.read()
    try:
        # 常用dev_pid参数:1537普通话(纯中文识别)、1737英语、1637粤语、1837四川话
        result = client.asr(voices, 'wav', 16000, {'dev_pid': 1537, })
        result_text = result["result"][0]
        print("我说: " + result_text)
        if result_text=="结束程序。":
            print("再见!")
            os._exit(0)

    # return result_text
    except KeyError:
        print("未知问题")

while True:
    my_record()
    request = listen()
9、VB6与Python通过COM组件联合编程
因为VB6提供了非常方便的“所见即所得”的界面方法,Python有强大的编程功能。
所以我们就使用COM组件,让VB6的界面与Python的功能联系在一起。
书上说:COM组件服务是提供一种独立于平台与编程语言之外的,共享二进制代码的方法。
翻译成人话:COM组件可以让不同的编程语言之间互相通信,至于它们之间说英语还是法语,我们现在不用关心。
先给大家两小段基本的代码,先理解原理,其它的就好办了。
1、先用Python注册COM服务,并在Python服务中写一个最简单的加法函数。
# coding=UTF8
import pythoncom

class PythonDemo:
    _public_methods_ = ['Test']
    _reg_progid_ = 'Demos'
    _reg_clsid_ = pythoncom.CreateGuid()

    def Test(self, val, val2):
        val = val + val2
        return val

if __name__ == '__main__':
    import win32com.server.register
    print('启动COM服务.')
    win32com.server.register.UseCommandLine(PythonDemo)
2、到VB6中设计一个简单的界面,写几行代码。

Private Sub Command1_Click()

    Set PythonUtils = CreateObject("Demos")
    response = PythonUtils.Test(a, b)

    a = Val(Text1.Text)
    b = Val(Text2.Text)
    Print response

End Sub
3、先运行Python代码,然后WINDOWS要多管闲事的问一下,这个程序你让不让他运行。
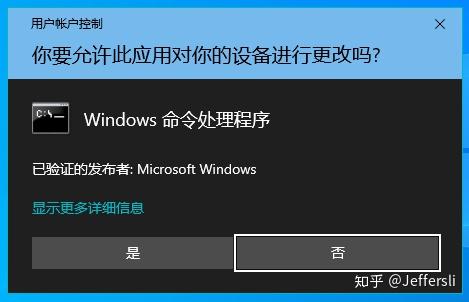

点“是”就可以启动COM组件服务,再到VB6中调用即可。
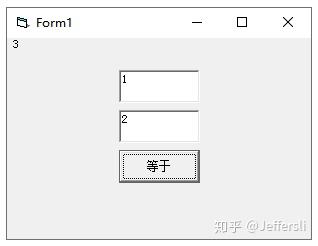
在VB6界面中输入1和2,在Python中计算加法,VB6中打印出结果。
10、Python与小米、YeeLight的互动
一、安装必要的小米智能家电、YeeLight模块:
pip install python-miio
pip install yeelight
二、获得设备的“令牌”,也就是token,这样就能操作设备了。
1、安装蓝叠安卓模拟器;
2、下载米家 5.4.54版本(这个版本才能看到日志文件),在模拟器上安装,登录小米账户,随便操作几下;
3、使用蓝叠自带的RE文件管理器,找到:/sdcard/SmartHome/logs/Plug_Devicemanager中找到名为yyyy-mm-dd.txt的日志文件,在其中搜索设备名称或IP地址,找到相关token即可。
4、YeeLight灯,是小米的生态企业,他们的操作就比较简单了,只要有IP地址,就可以操作。注意,要下载YeeLight的APP,在上面打开“联网控制”,才能进行Python操作。
三、输入代码:可以实现开关灯的同时,打开智能插座:
from miio.chuangmi_plug import ChuangmiPlug #小米智能家居的模块
from yeelight import Bulb #YeeLight的模块
import tkinter #为了写一个丑点的窗口

ip='192.168.31.41'
token='24dfac257f5940d4b30046c16e81ea52' # 输入之前获得的token

d = ChuangmiPlug(ip=ip, token=token) #智能插座
d2 = Bulb("192.168.31.131") #YeeLight灯

def kai():
    d.on()
    d2.turn_on()
def guan():
    d.off()
    d2.turn_off()
def usb_on():
    d.usb_on()
def usb_off():
    d.usb_off()

# 创建一个比较丑的界面,总比没有强
win = tkinter.Tk()
win.title("米家Python By:JeffersLi")
win.geometry("600x400+200+50")
button1 = tkinter.Button(win, text="打开", command=kai, width=10, height=1)
button1.pack()
button2 = tkinter.Button(win, text="关闭", command=guan, width=10, height=1)
button2.pack()
button3 = tkinter.Button(win, text="打开USB", command=usb_on, width=10, height=1)
button3.pack()
button4 = tkinter.Button(win, text="关闭USB", command=usb_off, width=10, height=1)
button4.pack()
win.mainloop()
11、摄像头拍照,并感情分析
1、网上的相关资料内容都比较老,这里引用的模型也不太准确,识别成功率最多也就80%吧。
2、各种模块不兼容,把每个模块的版本号都标了一下,省得大家不好找。
3、要下载三年前的这个老模型“model_v6_23.hdf5”,下载网址:https://github.com/priya-dwivedi/face_and_emotion_detection/raw/master/emotion_detector_models/model_v6_23.hdf5
import face_recognition #版本1.3.0
import numpy as np #版本1.21.5
import cv2 #版本4.5.5.62
from keras.models import load_model #版本2.7.0
#另外还需要dlib(版本19.22.1),cmake(版本号3.22.1)
cap = cv2.VideoCapture(0) #内置摄像头为0,外置摄像头为1
i = 0

def draw_guide_line(image_np):
    # 画辅助线
    [h1, h2, h3] = image_np.shape
    point_color = (100, 100, 255)  # BGR
    thickness = 1
    lineType = 8
    image_np = np.ascontiguousarray(image_np, dtype=np.uint8)  # 原来的图像在内存上的保存是不连续的
    cv2.line(image_np, [200, 0],[200, 480], point_color, thickness, lineType) #竖线
    cv2.line(image_np, [440, 0],[440, 480], point_color, thickness, lineType) #竖线
    cv2.line(image_np, [0, 100],[640, 100], point_color, thickness, lineType) #竖线
    cv2.line(image_np, [0, 380],[640, 380], point_color, thickness, lineType) #竖线
    return image_np

while (1):
    ret, frame = cap.read()
    key = cv2.waitKey(1)
    if key == 27: #按ESC键退出
        break
    elif key == ord('c') or key == ord('C'):  #按下C键拍照
        cv2.imwrite(str(i) + '.jpg', frame)
        file_path = str(i) + '.jpg'
        i += 1
        emotion_dict = {'生气': 0, '悲伤': 5, '中性': 4, '厌恶': 1, '惊讶': 6, '恐惧': 2, '高兴': 3}
        image = face_recognition.load_image_file(file_path)  # .载入图像
        face_locations = face_recognition.face_locations(image)  # 寻找脸部
        top, right, bottom, left = face_locations[0]  # 将脸部框起来
        face_image = image[top:bottom, left:right]
        face_image = cv2.resize(face_image, (48, 48))
        face_image = cv2.cvtColor(face_image, cv2.COLOR_BGR2GRAY)
        face_image = np.reshape(face_image, [1, face_image.shape[0], face_image.shape[1], 1])  # 调整到可以进入该模型输入的大小
        model = load_model("./model_v6_23.hdf5")  # 要下载三年前的这个老模型https://github.com/priya-dwivedi/face_and_emotion_detection/raw/master/emotion_detector_models/model_v6_23.hdf5
        predicted_class = np.argmax(model.predict(face_image))  # 分类情绪
        label_map = dict((v, k) for k, v in emotion_dict.items())
        predicted_label = label_map[predicted_class]  # 根据情绪映射表输出情绪
        print(predicted_label)
    frame = draw_guide_line(frame)
    cv2.imshow("capture", frame)
cap.release()
cv2.destroyAllWindows()
12、朗读PPT,自动帮你讲课
from pptx import Presentation
import win32com.client
import pyautogui as pg
import time
import tkinter
import tkinter as tk
from tkinter import filedialog
import sys

speaker = win32com.client.Dispatch("SAPI.SpVoice")

def start():
    file_path = filedialog.askopenfilename()
    ppt = win32com.client.Dispatch('PowerPoint.Application')
    ppt.Visible = 1
    ppt.Presentations.Open(file_path)
    win32com.client.gencache.EnsureDispatch('PowerPoint.Application')
    obj=Presentation(file_path)
    for index, slide in enumerate(obj.slides,start=1):
        print(f'第{index}页幻灯片'.center(20,'='))
        pg.press('enter')
        time.sleep(1)
        #PowePoint自带模板中每页幻灯片顶部的文本为title#如果自定义模板中没有title,返回空值None
        title=slide.shapes.title
        subtitle = slide.placeholders[0]

        if title:
            speaker.Speak(title.text)
        else:
            print('这一页幻灯片没有标题')

        if slide.placeholders[0]:
            speaker.Speak(subtitle.text)
        else:
            print('这一页幻灯片没有内容')

        if slide.has_notes_slide:
            speaker.Speak(slide.notes_slide.notes_text_frame.text)
        else:
            print('这一页幻灯片没有备注')

        if index==len(obj.slides):
            speaker.Speak('讲解完毕,谢谢大家!')
            sys.exit()
        else:
            time.sleep(1)

def stop():
    sys.exit()

# 创建主窗口
win = tkinter.Tk()
# 设置标题
win.title("自动朗读PPT By:JeffersLi")
# 设置大小和位置
win.geometry("600x400+200+50")
# 进入消息循环,可以写控件
# 创建按钮
button1 = tkinter.Button(win, text="打开PPT", command=start, width=10, height=1)
button2 = tkinter.Button(win, text="退出", command=stop, width=10, height=1)
button1.pack()
button2.pack()

win.mainloop()
13、最简单的浏览器:
最简单代码的浏览器示例:
import sys
from PyQt5.QtCore import QUrl
from PyQt5.QtWidgets import QApplication
from PyQt5.QtWebEngineWidgets import QWebEnginePage, QWebEngineView
from PyQt5.QtGui import QIcon
from PyQt5.QtCore import Qt #调用窗口状态

app = QApplication(sys.argv)

browser = QWebEngineView()
browser.setWindowIcon(QIcon("map.ico"))
browser.setWindowTitle("百度地图")
browser.load(QUrl("http://map.baidu.com/"))
browser.setWindowState(Qt.WindowMaximized) #窗口最大化
browser.show()

app.exec_()
以上内容,是我在学习的过程中积累的小代码小段,内容什么都有。在此,特别感谢一下那些只收藏不点赞的朋友们,不知道为啥有这样的操作。
既然都看到这儿了,加个关注吧,别总点个收藏就走,要做好“素质三连”的一个兵。