


在Android系统中,一个Activity对应一个应用程序窗口,任何一个Activity的启动都是由AMS服务和应用程序进程相互配合来完成的。AMS服务统一调度系统中所有进程的Activity启动,而每个Activity的启动过程则由其所属进程来完成。AMS服务通过realStartActivityLocked函数来通知应用程序进程启动某个Activity:
frameworks\base\services\java\com\android\server\am\ ActivityStack.java
final boolean realStartActivityLocked(ActivityRecord r,
		ProcessRecord app, boolean andResume, boolean checkConfig)
		throws RemoteException {
	...
	//系统参数发送变化,通知Activity
	if (checkConfig) {
		①Configuration config = mService.mWindowManager.updateOrientationFromAppTokens(mService.mConfiguration,
				r.mayFreezeScreenLocked(app) ? r.appToken : null);
		mService.updateConfigurationLocked(config, r, false, false);
	}
	//将进程描述符设置到启动的Activity描述符中
	r.app = app;
	app.waitingToKill = null;
	//将启动的Activity添加到进程启动的Activity列表中
	int idx = app.activities.indexOf(r);
	if (idx < 0) {
		app.activities.add(r);
	}
	mService.updateLruProcessLocked(app, true, true);
	try {
		...
		//通知应用程序进程加载Activity
		②app.thread.scheduleLaunchActivity(new Intent(r.intent), r.appToken,
				System.identityHashCode(r), r.info,
				new Configuration(mService.mConfiguration),
				r.compat, r.icicle, results, newIntents, !andResume,
				mService.isNextTransitionForward(), profileFile, profileFd,
				profileAutoStop);
		...
	} catch (RemoteException e) {
		...
	}
	if (mMainStack) {
		mService.startSetupActivityLocked();
	}
	return true;
}
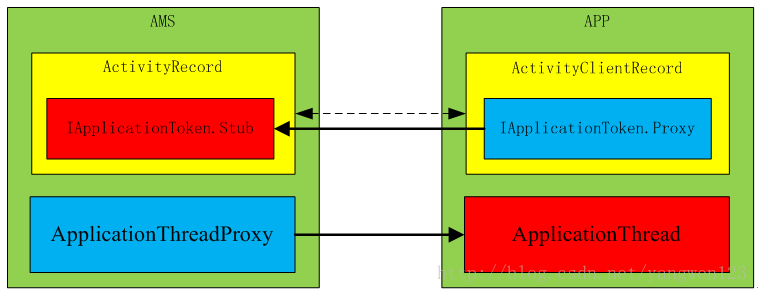
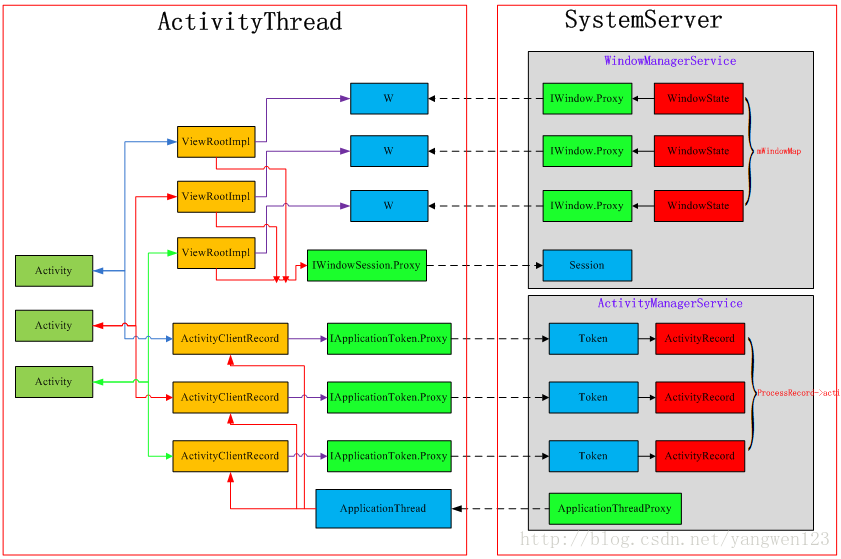
AMS通过realStartActivityLocked函数来调度应用程序进程启动一个Activity,参数r为即将启动的Activity在AMS服务中的描述符,参数app为Activity运行所在的应用程序进程在AMS服务中的描述符。函数通过IApplicationThread代理对象ApplicationThreadProxy通知应用程序进程启动r对应的Activity,应用程序进程完成Activity的加载等准备工作后,AMS最后启动该Activity。启动Activity的创建等工作是在应用程序进程中完成的,AMS是通过IApplicationThread接口和应用程序进程通信的。r.appToken 在AMS服务端的类型为Token,是IApplicationToken的Binder本地对象。
frameworks\base\core\java\android\app\ ActivityThread.java
public final void scheduleLaunchActivity(Intent intent, IBinder token, int ident,
		ActivityInfo info, Configuration curConfig, CompatibilityInfo compatInfo,
		Bundle state, List<ResultInfo> pendingResults,
		List<Intent> pendingNewIntents, boolean notResumed, boolean isForward,
		String profileName, ParcelFileDescriptor profileFd, boolean autoStopProfiler) {
	//将AMS服务传过来的参数封装为ActivityClientRecord对象
	ActivityClientRecord r = new ActivityClientRecord();
	r.token = token;
	r.ident = ident;
	r.intent = intent;
	r.activityInfo = info;
	r.compatInfo = compatInfo;
	r.state = state;
	r.pendingResults = pendingResults;
	r.pendingIntents = pendingNewIntents;
	r.startsNotResumed = notResumed;
	r.isForward = isForward;
	r.profileFile = profileName;
	r.profileFd = profileFd;
	r.autoStopProfiler = autoStopProfiler;
	updatePendingConfiguration(curConfig);
	//使用异步消息方式实现Activity的启动
	queueOrSendMessage(H.LAUNCH_ACTIVITY, r);
}
参数token从AMS服务端经过Binder传输到应用程序进程后,变为IApplicationToken的Binder代理对象,类型为IApplicationToken.Proxy,这是因为AMS和应用程序运行在不同的进程中。
通过queueOrSendMessage函数将Binder跨进程调用转换为应用程序进程中的异步消息处理
frameworks\base\core\java\android\app\ ActivityThread.java
private class H extends Handler {
 public void handleMessage(Message msg) {
	switch (msg.what) {
			case LAUNCH_ACTIVITY: {
				Trace.traceBegin(Trace.TRACE_TAG_ACTIVITY_MANAGER, "activityStart");
				ActivityClientRecord r = (ActivityClientRecord)msg.obj;
				r.packageInfo = getPackageInfoNoCheck(r.activityInfo.applicationInfo, r.compatInfo);
				handleLaunchActivity(r, null);
				Trace.traceEnd(Trace.TRACE_TAG_ACTIVITY_MANAGER);
			} break;
		}
	}
}
LAUNCH_ACTIVITY消息在应用程序主线程消息循环中得到处理,应用程序通过handleLaunchActivity函数来启动Activity。到此AMS服务就完成了Activity的调度任务,将Activity的启动过程完全交给了应用程序进程来完成。
frameworks\base\core\java\android\app\ ActivityThread.java
private void handleLaunchActivity(ActivityClientRecord r, Intent customIntent) {
	//主线程空闲时会定时执行垃圾回收,主线程当前要完成启动Activity的任务,因此这里先暂停GC
	unscheduleGcIdler();
	if (r.profileFd != null) {
		mProfiler.setProfiler(r.profileFile, r.profileFd);
		mProfiler.startProfiling();
		mProfiler.autoStopProfiler = r.autoStopProfiler;
	}
	// Make sure we are running with the most recent config.
	①handleConfigurationChanged(null, null);
	//创建Activity
	②Activity a = performLaunchActivity(r, customIntent);
	if (a != null) {
		r.createdConfig = new Configuration(mConfiguration);
		Bundle oldState = r.state;
		//启动Activity
		③handleResumeActivity(r.token, false, r.isForward);
		...
	}else{
		...
	}
}
performLaunchActivity
应用程序进程通过performLaunchActivity函数将即将要启动的Activity加载到当前进程空间来,同时为启动Activity做准备。
frameworks\base\core\java\android\app\ ActivityThread.java
private Activity performLaunchActivity(ActivityClientRecord r, Intent customIntent) {
	ActivityInfo aInfo = r.activityInfo;
	if (r.packageInfo == null) {
		//通过Activity所在的应用程序信息及该Activity对应的CompatibilityInfo信息从PMS服务中查询当前Activity的包信息
		r.packageInfo = getPackageInfo(aInfo.applicationInfo, r.compatInfo,Context.CONTEXT_INCLUDE_CODE);
	}
	//获取当前Activity的组件信息
	ComponentName component = r.intent.getComponent();
	if (component == null) {
		component = r.intent.resolveActivity(mInitialApplication.getPackageManager());
		r.intent.setComponent(component);
	}
	if (r.activityInfo.targetActivity != null) {
		//packageName为启动Activity的包名,targetActivity为Activity的类名
		component = new ComponentName(r.activityInfo.packageName,
				r.activityInfo.targetActivity);
	}
	//通过类反射方式加载即将启动的Activity
	Activity activity = null;
	try {
		java.lang.ClassLoader cl = r.packageInfo.getClassLoader();
		①activity = mInstrumentation.newActivity(cl, component.getClassName(), r.intent);
		StrictMode.incrementExpectedActivityCount(activity.getClass());
		r.intent.setExtrasClassLoader(cl);
		if (r.state != null) {
			r.state.setClassLoader(cl);
		}
	} catch (Exception e) {
		...
	}
	try {
		//通过单例模式为应用程序进程创建Application对象
		②Application app = r.packageInfo.makeApplication(false, mInstrumentation);
		if (activity != null) {
			//为当前Activity创建上下文对象ContextImpl
			ContextImpl appContext = new ContextImpl();
			//上下文初始化
			③appContext.init(r.packageInfo, r.token, this);
			appContext.setOuterContext(activity);
			CharSequence title = r.activityInfo.loadLabel(appContext.getPackageManager());
			...
			Configuration config = new Configuration(mCompatConfiguration);
			//将当前启动的Activity和上下文ContextImpl、Application绑定
			④activity.attach(appContext, this, getInstrumentation(), r.token,
					r.ident, app, r.intent, r.activityInfo, title, r.parent,
					r.embeddedID, r.lastNonConfigurationInstances, config);
			...
			//调用Activity的OnCreate函数
			⑤mInstrumentation.callActivityOnCreate(activity, r.state);
			...
			//将Activity保存到ActivityClientRecord中,ActivityClientRecord为Activity在应用程序进程中的描述符
			r.activity = activity;
			...
		}
		r.paused = true;
		//ActivityThread的成员变量mActivities保存了当前应用程序进程中的所有Activity的描述符
		mActivities.put(r.token, r);
	} catch (SuperNotCalledException e) {
		...
	}
	return activity;
}
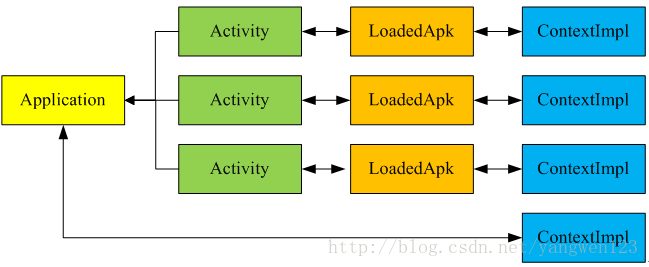
在该函数中,首先通过PMS服务查找到即将启动的Activity的包名信息,然后通过类反射方式创建一个该Activity实例,同时为应用程序启动的每一个Activity创建一个LoadedApk实例对象,应用程序进程中创建的所有LoadedApk对象保存在ActivityThread的成员变量mPackages中。接着通过LoadedApk对象的makeApplication函数,使用单例模式创建Application对象,因此在android应用程序进程中有且只有一个Application实例。然后为当前启动的Activity创建一个ContextImpl上下文对象,并初始化该上下文,到此我们可以知道,启动一个Activity需要以下对象:
1) XXActivity对象,需要启动的Activity;
2) LoadedApk对象,每个启动的Activity都拥有属于自身的LoadedApk对象;
3) ContextImpl对象,每个启动的Activity都拥有属于自身的ContextImpl对象;
4) Application对象,应用程序进程中有且只有一个实例,和Activity是一对多的关系;
加载Activity类
public Activity newActivity(ClassLoader cl, String className,
		Intent intent)
		throws InstantiationException, IllegalAccessException,
		ClassNotFoundException {
	return (Activity)cl.loadClass(className).newInstance();
}
这里通过类反射的方式来加载要启动的Activity实例对象。
LoadedApk构造过程
首先介绍一下LoadedApk对象的构造过程:
frameworks\base\core\java\android\app\ ActivityThread.java
public final LoadedApk getPackageInfo(String packageName, CompatibilityInfo compatInfo,
		int flags) {
	synchronized (mPackages) {
		//通过Activity的包名从对应的成员变量中查找LoadedApk对象
		WeakReference<LoadedApk> ref;
		if ((flags&Context.CONTEXT_INCLUDE_CODE) != 0) {
			ref = mPackages.get(packageName);
		} else {
			ref = mResourcePackages.get(packageName);
		}
		LoadedApk packageInfo = ref != null ? ref.get() : null;
		if (packageInfo != null && (packageInfo.mResources == null
				|| packageInfo.mResources.getAssets().isUpToDate())) {
			...
			return packageInfo;
		}
	}
	//如果没有,则为当前Activity创建对应的LoadedApk对象
	ApplicationInfo ai = null;
	try {
		//通过包名在PMS服务中查找应用程序信息
		ai = getPackageManager().getApplicationInfo(packageName,
				PackageManager.GET_SHARED_LIBRARY_FILES, UserId.myUserId());
	} catch (RemoteException e) {
		// Ignore
	}
	//使用另一个重载函数创建LoadedApk对象
	if (ai != null) {
		return getPackageInfo(ai, compatInfo, flags);
	}
	return null;
}
public final LoadedApk getPackageInfo(ApplicationInfo ai, CompatibilityInfo compatInfo,
		int flags) {
	boolean includeCode = (flags&Context.CONTEXT_INCLUDE_CODE) != 0;
	boolean securityViolation = includeCode && ai.uid != 0
			&& ai.uid != Process.SYSTEM_UID && (mBoundApplication != null
					? !UserId.isSameApp(ai.uid, mBoundApplication.appInfo.uid)
					: true);
	if ((flags&(Context.CONTEXT_INCLUDE_CODE|Context.CONTEXT_IGNORE_SECURITY))
			== Context.CONTEXT_INCLUDE_CODE) {
		...
	}
	return getPackageInfo(ai, compatInfo, null, securityViolation, includeCode);
}
private LoadedApk getPackageInfo(ApplicationInfo aInfo, CompatibilityInfo compatInfo,
		ClassLoader baseLoader, boolean securityViolation, boolean includeCode) {
	//再次从对应的成员变量中查找LoadedApk实例
	synchronized (mPackages) {
		WeakReference<LoadedApk> ref;
		if (includeCode) {
			ref = mPackages.get(aInfo.packageName);
		} else {
			ref = mResourcePackages.get(aInfo.packageName);
		}
		LoadedApk packageInfo = ref != null ? ref.get() : null;
		if (packageInfo == null || (packageInfo.mResources != null
				&& !packageInfo.mResources.getAssets().isUpToDate())) {
			...
			//构造一个LoadedApk对象
			packageInfo =new LoadedApk(this, aInfo, compatInfo, this, baseLoader,
						securityViolation, includeCode &&
						(aInfo.flags&ApplicationInfo.FLAG_HAS_CODE) != 0);
			//保存LoadedApk实例到ActivityThread的相应成员变量中
			if (includeCode) {
				mPackages.put(aInfo.packageName,
						new WeakReference<LoadedApk>(packageInfo));
			} else {
				mResourcePackages.put(aInfo.packageName,
						new WeakReference<LoadedApk>(packageInfo));
			}
		}
		return packageInfo;
	}
}
frameworks\base\core\java\android\app\LoadedApk.java
public LoadedApk(ActivityThread activityThread, ApplicationInfo aInfo,
		CompatibilityInfo compatInfo,
		ActivityThread mainThread, ClassLoader baseLoader,
		boolean securityViolation, boolean includeCode) {
	mActivityThread = activityThread;
	mApplicationInfo = aInfo;
	mPackageName = aInfo.packageName;
	mAppDir = aInfo.sourceDir;
	final int myUid = Process.myUid();
	mResDir = aInfo.uid == myUid ? aInfo.sourceDir
			: aInfo.publicSourceDir;
	if (!UserId.isSameUser(aInfo.uid, myUid) && !Process.isIsolated()) {
		aInfo.dataDir = PackageManager.getDataDirForUser(UserId.getUserId(myUid),
				mPackageName);
	}
	mSharedLibraries = aInfo.sharedLibraryFiles;
	mDataDir = aInfo.dataDir;
	mDataDirFile = mDataDir != null ? new File(mDataDir) : null;
	mLibDir = aInfo.nativeLibraryDir;
	mBaseClassLoader = baseLoader;
	mSecurityViolation = securityViolation;
	mIncludeCode = includeCode;
	mCompatibilityInfo.set(compatInfo);
	if (mAppDir == null) {
		//为应用程序进程创建一个ContextImpl上下文
		if (ActivityThread.mSystemContext == null) {
			ActivityThread.mSystemContext =
				ContextImpl.createSystemContext(mainThread);
			ActivityThread.mSystemContext.getResources().updateConfiguration(
					 mainThread.getConfiguration(),
					 mainThread.getDisplayMetricsLocked(compatInfo, false),
					 compatInfo);
		}
		mClassLoader = ActivityThread.mSystemContext.getClassLoader();
		mResources = ActivityThread.mSystemContext.getResources();
	}
}
从以上LoadedApk的构造函数可以看出,LoadedApk类记录了Activity运行所在的ActivityThread、Activity所在的应用程序信息、Activity的包名、Activity的资源路径、Activity的库路径、Activity的数据存储路径、类加载器和应用程序所使用的资源等信息。
Application构造过程
当Activity为应用程序进程启动的第一个Activity,因此需要构造一个Application对象
frameworks\base\core\java\android\app\LoadedApk.java
public Application makeApplication(boolean forceDefaultAppClass,
		Instrumentation instrumentation) {
	//在应用程序进程空间以单例模式创建Application对象
	if (mApplication != null) {
		return mApplication;
	}
	Application app = null;
	//得到应用程序的Application类名
	String appClass = mApplicationInfo.className;
	//如果应用程序没用重写Application,则使用Android默认的Application类
	if (forceDefaultAppClass || (appClass == null)) {
		appClass = "android.app.Application";
	}
	try {
		java.lang.ClassLoader cl = getClassLoader();
		//为Application实例创建一个上下文对象ContextImpl
		①ContextImpl appContext = new ContextImpl();
		//初始化上下文
		②appContext.init(this, null, mActivityThread);
		//创建Application实例对象
		③app = mActivityThread.mInstrumentation.newApplication(
				cl, appClass, appContext);
		appContext.setOuterContext(app);
	} catch (Exception e) {
		...
	}
	mActivityThread.mAllApplications.add(app);
	mApplication = app;
	if (instrumentation != null) {
		try {
			//调用Application的OnCreate函数
			④instrumentation.callApplicationOnCreate(app);
		} catch (Exception e) {
			...
		}
	}
	return app;
}
在应用程序开发过程中,当我们重写了Application类后,应用程序加载运行的是我们定义的Application类,否则就加载运行默认的Application类。从Application对象的构造过程就可以解释为什么应用程序启动后首先执行的是Application的OnCreate函数。在实例化Application对象时,同样创建并初始化了一个ContextImpl上下文对象。
ContextImpl构造过程
前面我们介绍了,每一个Activity拥有一个上下文对象ContextImpl,每一个Application对象也拥有一个ContextImpl上下文对象,那么ContextImpl对象又是如何构造的呢?
frameworks\base\core\java\android\app\ ContextImpl.java
ContextImpl() {
	mOuterContext = this;
}
ContextImpl的构造过程什么也没干,通过调用ContextImpl的init函数进行初始化
final void init(LoadedApk packageInfo,IBinder activityToken, ActivityThread mainThread) {
	init(packageInfo, activityToken, mainThread, null, null);
}
final void init(LoadedApk packageInfo,IBinder activityToken, ActivityThread mainThread,
			Resources container, String basePackageName) {
	mPackageInfo = packageInfo;
	mBasePackageName = basePackageName != null ? basePackageName : packageInfo.mPackageName;
	mResources = mPackageInfo.getResources(mainThread);
	if (mResources != null && container != null
			&& container.getCompatibilityInfo().applicationScale !=
					mResources.getCompatibilityInfo().applicationScale) {
		mResources = mainThread.getTopLevelResources(
				mPackageInfo.getResDir(), container.getCompatibilityInfo());
	}
	mMainThread = mainThread;
	mContentResolver = new ApplicationContentResolver(this, mainThread);
	setActivityToken(activityToken);
}
从ContextImpl的初始化函数中可以知道,ContextImpl记录了应用程序的包名信息、应用程序的资源信息、应用程序的主线程、ContentResolver及Activity对应的IApplicationToken.Proxy,当然对应Application对象所拥有的ContextImpl上下文就没有对应的Token了。通过前面的分析我们可以知道各个对象之间的关系:
对象Attach过程
Activity所需要的对象都创建好了,就需要将Activity和Application对象、ContextImpl对象绑定在一起。
frameworks\base\core\java\android\app\ Activity.java
final void attach(Context context, ActivityThread aThread, Instrumentation instr, IBinder token,
		Application application, Intent intent, ActivityInfo info, CharSequence title,
		Activity parent, String id, NonConfigurationInstances lastNonConfigurationInstances,
		Configuration config) {
	attach(context, aThread, instr, token, 0, application, intent, info, title, parent, id,
		lastNonConfigurationInstances, config);
}
context:Activity的上下文对象,就是前面创建的ContextImpl对象;
aThread:Activity运行所在的主线程描述符ActivityThread;
instr:用于监控Activity运行状态的Instrumentation对象;
token:用于和AMS服务通信的IApplicationToken.Proxy代理对象;
application:Activity运行所在进程的Application对象;
parent:启动当前Activity的Activity;
final void attach(Context context, ActivityThread aThread,
		Instrumentation instr, IBinder token, int ident,
		Application application, Intent intent, ActivityInfo info,
		CharSequence title, Activity parent, String id,
		NonConfigurationInstances lastNonConfigurationInstances,
		Configuration config) {
	//将上下文对象ContextImpl保存到Activity的成员变量中
	attachBaseContext(context);
	//每个Activity都拥有一个FragmentManager,这里就是将当前Activity设置到FragmentManager中管理
	mFragments.attachActivity(this);
	//创建窗口对象
	①mWindow = PolicyManager.makeNewWindow(this);
	mWindow.setCallback(this);
	mWindow.getLayoutInflater().setPrivateFactory(this);
	if (info.softInputMode != WindowManager.LayoutParams.SOFT_INPUT_STATE_UNSPECIFIED) {
		mWindow.setSoftInputMode(info.softInputMode);
	}
	if (info.uiOptions != 0) {
		mWindow.setUiOptions(info.uiOptions);
	}
	//记录应用程序的UI线程
	mUiThread = Thread.currentThread();
	//记录应用程序的ActivityThread对象
	mMainThread = aThread;
	mInstrumentation = instr;
	mToken = token;
	mIdent = ident;
	mApplication = application;
	mIntent = intent;
	mComponent = intent.getComponent();
	mActivityInfo = info;
	mTitle = title;
	mParent = parent;
	mEmbeddedID = id;
	mLastNonConfigurationInstances = lastNonConfigurationInstances;
	//为Activity所在的窗口创建窗口管理器
	②mWindow.setWindowManager(null, mToken, mComponent.flattenToString(),
			(info.flags & ActivityInfo.FLAG_HARDWARE_ACCELERATED) != 0);
	if (mParent != null) {
		mWindow.setContainer(mParent.getWindow());
	}
	mWindowManager = mWindow.getWindowManager();
	mCurrentConfig = config;
}
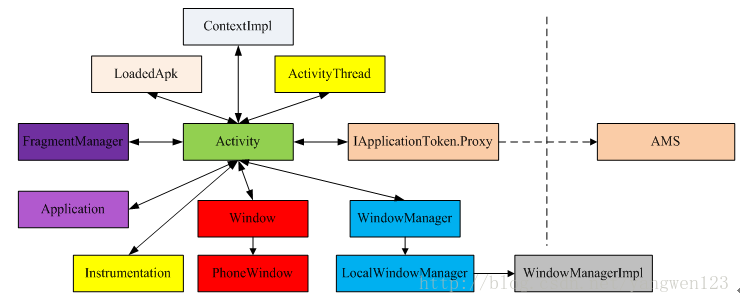
在该attach函数中主要做了以下几件事:
1) 将Activity设置到FragmentManager中;
2) 根据参数初始化Activity的成员变量;
3) 为Activity创建窗口Window对象;
4) 为Window创建窗口管理器;
到此为止应用程序进程为启动的Activity对象创建了以下不同的实例对象,它们之间的关系如下:
应用程序窗口创建过程
frameworks\base\core\java\com\android\internal\policy\ PolicyManager.java
public static Window makeNewWindow(Context context) {
	return sPolicy.makeNewWindow(context);
}
通过Policy类的makeNewWindow函数来创建一个应用程序窗口
private static final String POLICY_IMPL_CLASS_NAME =
        "com.android.internal.policy.impl.Policy";
private static final IPolicy sPolicy;
static {
	try {
		Class policyClass = Class.forName(POLICY_IMPL_CLASS_NAME);
		sPolicy = (IPolicy)policyClass.newInstance();
	} catch (ClassNotFoundException ex) {
		...
	}
}
frameworks\base\policy\src\com\android\internal\policy\impl\ Policy.java
public Window makeNewWindow(Context context) {
	return new PhoneWindow(context);
}
应用程序窗口的创建过程其实就是构造一个PhoneWindow对象。PhoneWindow类是通过静态方式加载到应用程序进程空间的。
private static final String[] preload_classes = {
	"com.android.internal.policy.impl.PhoneLayoutInflater",
	"com.android.internal.policy.impl.PhoneWindow",
	"com.android.internal.policy.impl.PhoneWindow$1",
	"com.android.internal.policy.impl.PhoneWindow$ContextMenuCallback",
	"com.android.internal.policy.impl.PhoneWindow$DecorView",
	"com.android.internal.policy.impl.PhoneWindow$PanelFeatureState",
	"com.android.internal.policy.impl.PhoneWindow$PanelFeatureState$SavedState",
};
static {
	for (String s : preload_classes) {
		try {
			Class.forName(s);
		} catch (ClassNotFoundException ex) {
			Log.e(TAG, "Could not preload class for phone policy: " + s);
		}
	}
}
PhoneWindow的构造过程
public PhoneWindow(Context context) {
	super(context);
	mAlternativePanelStyle=getContext().getResources().getBoolean(com.android.internal.R.bool.config_alternativePanelStyle);
	mLayoutInflater = LayoutInflater.from(context);
}
构造过程比较简单,只是得到布局加载服务对象。
窗口管理器创建过程
通过前面的分析我们可以知道,在Activity启动过程中,会为Activity创建一个窗口对象PhoneWindow,应用程序有了窗口那就需要有一个窗口管理器来管理这些窗口,因此在Activity启动过程中还会创建一个WindowManager对象。
frameworks\base\core\java\android\view\ Window.java
public void setWindowManager(WindowManager wm, IBinder appToken, String appName,
boolean hardwareAccelerated) {
mAppToken = appToken;// IApplicationToken.Proxy代理对象
mAppName = appName;
//得到WindowManagerImpl实例,
if (wm == null) {
wm = WindowManagerImpl.getDefault();
}
//为每个启动的Activity创建一个轻量级的窗口管理器LocalWindowManager
mWindowManager = new LocalWindowManager(wm, hardwareAccelerated);
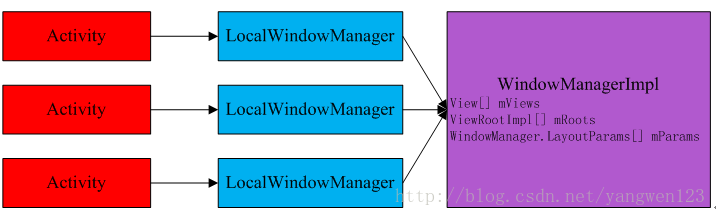
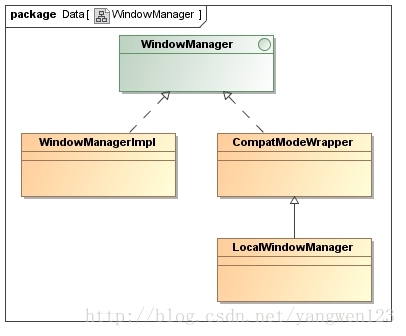
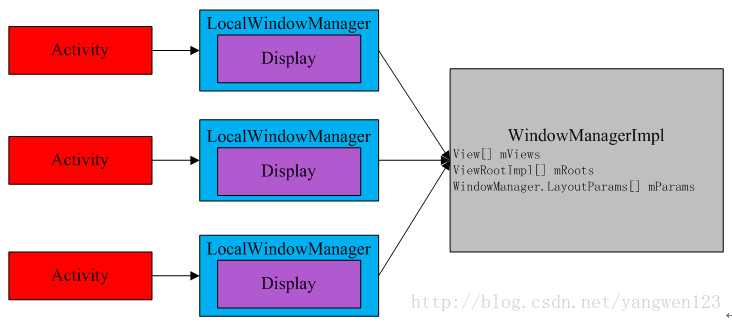
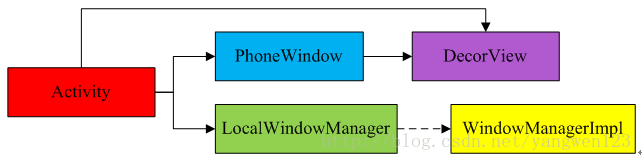
}WindowManagerImpl为重量级的窗口管理器,应用程序进程中有且只有一个WindowManagerImpl实例,它管理了应用程序进程中创建的所有PhoneWindow窗口。Activity并没有直接引用WindowManagerImpl实例,Android系统为每一个启动的Activity创建了一个轻量级的窗口管理器LocalWindowManager,每个Activity通过LocalWindowManager来访问WindowManagerImpl,它们三者之间的关系如下图所示:
WindowManagerImpl以单例模式创建,应用程序进程中有且只有一个WindowManagerImpl实例
frameworks\base\core\java\android\view\ WindowManagerImpl.java
private final static WindowManagerImpl sWindowManager = new WindowManagerImpl();
public static WindowManagerImpl getDefault() {
	return sWindowManager;
}
应用程序进程会为每一个Activity创建一个LocalWindowManager实例对象
frameworks\base\core\java\android\view\ Window.java
LocalWindowManager(WindowManager wm, boolean hardwareAccelerated) {
	super(wm, getCompatInfo(mContext));
	mHardwareAccelerated = hardwareAccelerated ||
			SystemProperties.getBoolean(PROPERTY_HARDWARE_UI, false);
}
frameworks\base\core\java\android\view\ WindowManagerImpl.java
CompatModeWrapper(WindowManager wm, CompatibilityInfoHolder ci) {
	mWindowManager = wm instanceof CompatModeWrapper
			? ((CompatModeWrapper)wm).mWindowManager : (WindowManagerImpl)wm;
	if (ci == null) {
		mDefaultDisplay = mWindowManager.getDefaultDisplay();
	} else {
		mDefaultDisplay = Display.createCompatibleDisplay(
				mWindowManager.getDefaultDisplay().getDisplayId(), ci);
	}
	mCompatibilityInfo = ci;
}
public Display getDefaultDisplay() {
	return new Display(Display.DEFAULT_DISPLAY, null);
}
frameworks\base\core\java\android\view\Display.java
Display(int display, CompatibilityInfoHolder compatInfo) {
	synchronized (sStaticInit) {
		if (!sInitialized) {
			nativeClassInit();
			sInitialized = true;
		}
	}
	mCompatibilityInfo = compatInfo != null ? compatInfo : new CompatibilityInfoHolder();
	mDisplay = display;
	init(display);
}
构造Display对象时需要初始化该对象。
frameworks\base\core\jni\android_view_Display.cpp
static void android_view_Display_init(
        JNIEnv* env, jobject clazz, jint dpy)
{
    DisplayInfo info;
    if (headless) {
        // initialize dummy display with reasonable values
        info.pixelFormatInfo.format = 1; // RGB_8888
        info.fps = 60;
        info.density = 160;
        info.xdpi = 160;
        info.ydpi = 160;
    } else {
        status_t err = SurfaceComposerClient::getDisplayInfo(DisplayID(dpy), &info);
        if (err < 0) {
            jniThrowException(env, "java/lang/IllegalArgumentException", NULL);
            return;
        }
    }
    env->SetIntField(clazz, offsets.pixelFormat,info.pixelFormatInfo.format);
    env->SetFloatField(clazz, offsets.fps,      info.fps);
    env->SetFloatField(clazz, offsets.density,  info.density);
    env->SetFloatField(clazz, offsets.xdpi,     info.xdpi);
    env->SetFloatField(clazz, offsets.ydpi,     info.ydpi);
}
Display的初始化过程很简单,就是通过SurfaceComposerClient请求SurfaceFlinger得到显示屏的基本信息。
frameworks\native\libs\gui\ SurfaceComposerClient.cpp
status_t SurfaceComposerClient::getDisplayInfo(
        DisplayID dpy, DisplayInfo* info)
{
    if (uint32_t(dpy)>=NUM_DISPLAY_MAX)
        return BAD_VALUE;
    volatile surface_flinger_cblk_t const * cblk = get_cblk();
    volatile display_cblk_t const * dcblk = cblk->displays + dpy;
    info->w              = dcblk->w;
    info->h              = dcblk->h;
    info->orientation      = dcblk->orientation;
    info->xdpi           = dcblk->xdpi;
    info->ydpi           = dcblk->ydpi;
    info->fps            = dcblk->fps;
    info->density        = dcblk->density;
    return getPixelFormatInfo(dcblk->format, &(info->pixelFormatInfo));
}
我们知道在SurfaceFlinger启动过程中,创建了一块匿名共享内存来保存显示屏的基本信息,这里就是通过访问这块匿名共享内存来读取显示屏信息。到此一个Activity所需要的窗口对象就创建完成了,在应用程序窗口的创建过程中一共创建了以下几个对象:
Activity视图对象的创建过程
在Activity的attach函数中完成应用程序窗口的创建后,通过Instrumentation回调Activity的OnCreate函数来为当前Activity加载布局文件,进一步创建视图对象。
frameworks\base\core\java\android\app\Instrumentation.java
public void callActivityOnCreate(Activity activity, Bundle icicle) {
	...
	activity.performCreate(icicle);
	...
}
frameworks\base\core\java\android\app\Activity.java
final void performCreate(Bundle icicle) {
	onCreate(icicle);
	mVisibleFromClient = !mWindow.getWindowStyle().getBoolean(
			com.android.internal.R.styleable.Window_windowNoDisplay, false);
	mFragments.dispatchActivityCreated();
}
我们知道在应用程序开发中,需要重写Activity的OnCreate函数:
Packages\apps\xxx\src\com\xxx\ xxxActivity.java
public void onCreate(Bundle savedInstanceState) {
	super.onCreate(savedInstanceState);
	setContentView(R.layout.main_activity);
	...
}
在OnCreate函数中通过setContentView来设置Activity的布局文件,就是生成该Activity的所有视图对象。
frameworks\base\core\java\android\app\Activity.java
public void setContentView(View view, ViewGroup.LayoutParams params) {
	getWindow().setContentView(view, params);
	//初始化动作条
	initActionBar();
}
getWindow()函数得到前面创建的窗口对象PhoneWindow,通过PhoneWindow来设置Activity的视图。
frameworks\base\policy\src\com\android\internal\policy\impl\PhoneWindow.java
public void setContentView(int layoutResID) {
	//如果窗口顶级视图对象为空,则创建窗口视图对象
	if (mContentParent == null) {
		installDecor();
	} else {//否则只是移除该视图对象中的其他视图
		mContentParent.removeAllViews();
	}
	//加载布局文件,并将布局文件中的所有视图对象添加到mContentParent容器中
	mLayoutInflater.inflate(layoutResID, mContentParent);
	final Callback cb = getCallback();
	if (cb != null && !isDestroyed()) {
		cb.onContentChanged();
	}
}
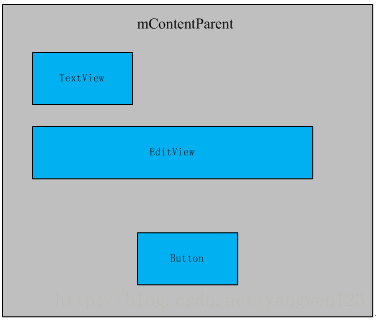
PhoneWindow的成员变量mContentParent的类型为ViewGroup,是窗口内容存放的地方
frameworks\base\policy\src\com\android\internal\policy\impl\PhoneWindow.java
private void installDecor() {
	if (mDecor == null) {
		①mDecor = generateDecor();
		mDecor.setDescendantFocusability(ViewGroup.FOCUS_AFTER_DESCENDANTS);
		mDecor.setIsRootNamespace(true);
		if (!mInvalidatePanelMenuPosted && mInvalidatePanelMenuFeatures != 0) {
			mDecor.postOnAnimation(mInvalidatePanelMenuRunnable);
		}
	}
	if (mContentParent == null) {
		②mContentParent = generateLayout(mDecor);
		mDecor.makeOptionalFitsSystemWindows();
		//应用程序窗口标题栏
		mTitleView = (TextView)findViewById(com.android.internal.R.id.title);
		if (mTitleView != null) {
			...
		} else {
			//应用程序窗口动作条
			mActionBar = (ActionBarView) findViewById(com.android.internal.R.id.action_bar);
			if (mActionBar != null) {
				...
			}
		}
	}
}
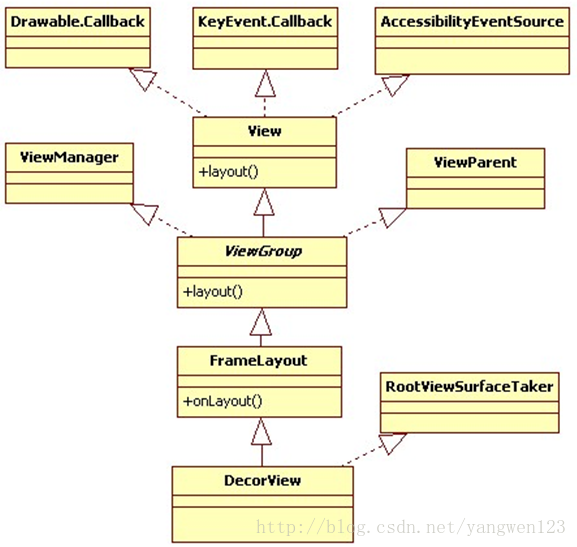
通过函数generateDecor()来创建一个DecorView对象
protected DecorView generateDecor() {
	return new DecorView(getContext(), -1);
}
接着通过generateLayout(mDecor)来创建视图对象容器mContentParent
protected ViewGroup generateLayout(DecorView decor) {
	//通过读取属性配置文件设置窗口风格
	if (a.getBoolean(com.android.internal.R.styleable.Window_windowActionBarOverlay, false)) {
		requestFeature(FEATURE_ACTION_BAR_OVERLAY);
	}
	...
	//通过读取属性配置文件设置窗口标志
	if (a.getBoolean(com.android.internal.R.styleable.Window_windowFullscreen, false)) {
	setFlags(FLAG_FULLSCREEN,FLAG_FULLSCREEN&(~getForcedWindowFlags()));
	}
	...
	WindowManager.LayoutParams params = getAttributes();
	...
	mDecor.startChanging();
	//根据窗口主题风格选择不同的布局文件layoutResource
	...
	//加载布局文件
	①View in = mLayoutInflater.inflate(layoutResource, null);
	//添加到DecorView中
	②decor.addView(in, new ViewGroup.LayoutParams(MATCH_PARENT, MATCH_PARENT));
	//从窗口视图中找出窗口内容视图对象
	③ViewGroup contentParent = (ViewGroup)findViewById(ID_ANDROID_CONTENT);
	...
	mDecor.finishChanging();
	return contentParent;
}
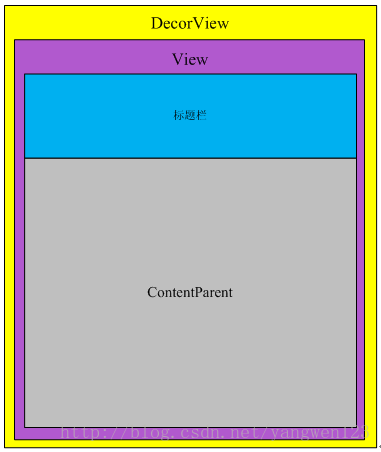
到此Activity的所有视图对象都已经创建完毕,DecorView是Activity的顶级视图,由窗口PhoneWindow对象持有,在DecorView视图对象中添加了一个ViewGroup容器组件contentParent,所有用户定义视图组件将被添加到该容器中。
handleResumeActivity
performLaunchActivity函数完成了两件事:
1) Activity窗口对象的创建,通过attach函数来完成;
2) Activity视图对象的创建,通过setContentView函数来完成;
这些准备工作完成后,就可以显示该Activity了,应用程序进程通过调用handleResumeActivity函数来启动Activity的显示过程。
frameworks\base\core\java\android\app\ ActivityThread.java
final void handleResumeActivity(IBinder token, boolean clearHide, boolean isForward) {
	unscheduleGcIdler();
	ActivityClientRecord r;
	try {
		①r = performResumeActivity(token, clearHide);
	} catch (Exception e) {
		...
	}
	if (r != null) {
		final Activity a = r.activity;
		...
		if (r.window == null && !a.mFinished && willBeVisible) {
			//获得为当前Activity创建的窗口PhoneWindow对象
			r.window = r.activity.getWindow();
			//获取为窗口创建的视图DecorView对象
			View decor = r.window.getDecorView();
			decor.setVisibility(View.INVISIBLE);
			//在attach函数中就为当前Activity创建了WindowManager对象
			ViewManager wm = a.getWindowManager();
			//得到该视图对象的布局参数
			②WindowManager.LayoutParams l = r.window.getAttributes();
			//将视图对象保存到Activity的成员变量mDecor中
			a.mDecor = decor;
			l.type = WindowManager.LayoutParams.TYPE_BASE_APPLICATION;
			if (r.intent.hasCategory(Intent.CATEGORY_HOME)) {
				l.idleScreenAvailable = true;
			} else {
				l.idleScreenAvailable = false;
			}
			l.softInputMode |= forwardBit;
			if (a.mVisibleFromClient) {
				a.mWindowAdded = true;
				//将创建的视图对象DecorView添加到Activity的窗口管理器中
				③wm.addView(decor, l);
			}
		} else if (!willBeVisible) {
			...
		}
		...
		if (!r.onlyLocalRequest) {
			r.nextIdle = mNewActivities;
			mNewActivities = r;
			Looper.myQueue().addIdleHandler(new Idler());
		}
		...
	} else {
		...
	}
}
我们知道,在前面的performLaunchActivity函数中完成Activity的创建后,会将当前当前创建的Activity在应用程序进程端的描述符ActivityClientRecord以键值对的形式保存到ActivityThread的成员变量mActivities中:mActivities.put(r.token, r),r.token就是Activity的身份证,即是IApplicationToken.Proxy代理对象,也用于与AMS通信。上面的函数首先通过performResumeActivity从mActivities变量中取出Activity的应用程序端描述符ActivityClientRecord,然后取出前面为Activity创建的视图对象DecorView和窗口管理器WindowManager,最后将视图对象添加到窗口管理器中。
我们知道Activity引用的其实是轻量级的窗口管理器LocalWindowManager
frameworks\base\core\java\android\view\ Window.java
public final void addView(View view, ViewGroup.LayoutParams params) {
	WindowManager.LayoutParams wp = (WindowManager.LayoutParams)params;
	CharSequence curTitle = wp.getTitle();
	//应用程序窗口
	if (wp.type >= WindowManager.LayoutParams.FIRST_SUB_WINDOW &&
		wp.type <= WindowManager.LayoutParams.LAST_SUB_WINDOW) {
		if (wp.token == null) {
			View decor = peekDecorView();
			if (decor != null) {
				// LayoutParams 的token设置为W本地Binder对象
				wp.token = decor.getWindowToken();
			}
		}
		if (curTitle == null || curTitle.length() == 0) {
			//根据窗口类型设置不同的标题
			…
			if (mAppName != null) {
				title += ":" + mAppName;
			}
			wp.setTitle(title);
		}
	} else {//系统窗口
		if (wp.token == null) {
			wp.token = mContainer == null ? mAppToken : mContainer.mAppToken;
		}
		if ((curTitle == null || curTitle.length() == 0)
				&& mAppName != null) {
			wp.setTitle(mAppName);
		}
    }
	if (wp.packageName == null) {
		wp.packageName = mContext.getPackageName();
	}
	if (mHardwareAccelerated) {
		wp.flags |= WindowManager.LayoutParams.FLAG_HARDWARE_ACCELERATED;
	}
	super.addView(view, params);
}
LocalWindowManager的addView函数对不同类型窗口的布局参数进行相应的设置,比如布局参数中的token设置,如果是应用程序窗口,则设置token为W本地Binder对象。如果不是应用程序窗口,同时当前窗口没有父窗口,则设置token为当前窗口的IApplicationToken.Proxy代理对象,否则设置为父窗口的IApplicationToken.Proxy代理对象。最后视图组件的添加工作交给其父类来完成。LocalWindowManager继承于CompatModeWrapper,是WindowManagerImpl的内部类。
frameworks\base\core\java\android\view\WindowManagerImpl.java
public void addView(View view, android.view.ViewGroup.LayoutParams params) {
	mWindowManager.addView(view, params, mCompatibilityInfo);
}
前面我们介绍了,每一个Activity拥有一个轻量级窗口管理器,通过轻量级窗口管理器LocalWindowManager来访问重量级窗口管理器WindowManagerImpl,因此视图组件的添加过程又转交给了WindowManagerImpl来实现。
public void addView(View view, ViewGroup.LayoutParams params, CompatibilityInfoHolder cih) {
	addView(view, params, cih, false);
}
该函数又调用WindowManagerImpl的另一个重载函数来添加视图组件
private void addView(View view, ViewGroup.LayoutParams params,
		CompatibilityInfoHolder cih, boolean nest) {
	...
	final WindowManager.LayoutParams wparams= (WindowManager.LayoutParams)params;
	ViewRootImpl root;
	View panelParentView = null;
	synchronized (this) {
		...
		//从mViews中查找当前添加的View
		int index = findViewLocked(view, false);
		//如果已经存在,直接返回
		if (index >= 0) {
			...
			return;
		}
		//尚未添加当前View
		if (wparams.type >= WindowManager.LayoutParams.FIRST_SUB_WINDOW &&
				wparams.type <= WindowManager.LayoutParams.LAST_SUB_WINDOW) {
			final int count = mViews != null ? mViews.length : 0;
			for (int i=0; i<count; i++) {
				if (mRoots[i].mWindow.asBinder() == wparams.token) {
					panelParentView = mViews[i];
				}
			}
		}
		//为Activity创建一个ViewRootImpl对象
		①root = new ViewRootImpl(view.getContext());
		...
		//设置视图组件的布局参数
		view.setLayoutParams(wparams);
		if (mViews == null) {
			index = 1;
			mViews = new View[1];
			mRoots = new ViewRootImpl[1];
			mParams = new WindowManager.LayoutParams[1];
		} else {
			//动态增加mViews数组长度
			index = mViews.length + 1;
			Object[] old = mViews;
			mViews = new View[index];
			System.arraycopy(old, 0, mViews, 0, index-1);
			//动态增加mRoots数组长度
			old = mRoots;
			mRoots = new ViewRootImpl[index];
			System.arraycopy(old, 0, mRoots, 0, index-1);
			//动态增加mParams数组长度
			old = mParams;
			mParams = new WindowManager.LayoutParams[index];
			System.arraycopy(old, 0, mParams, 0, index-1);
		}
		index--;
		②mViews[index] = view;
		mRoots[index] = root;
		mParams[index] = wparams;
	}
	try {
		③root.setView(view, wparams, panelParentView);
	} catch (RuntimeException e) {
		...
	}
}
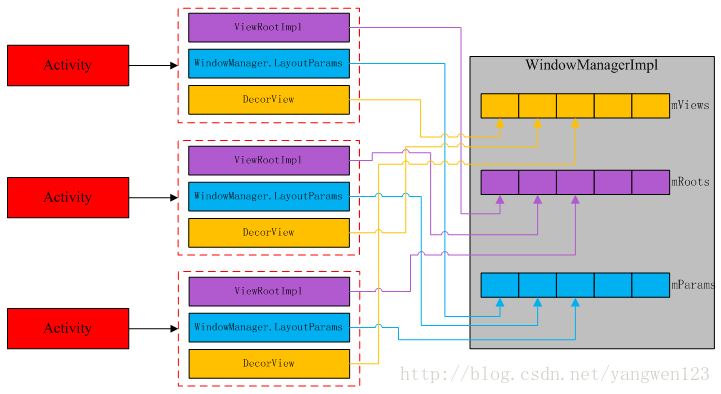
到此我们知道,当应用程序向窗口管理器中添加一个视图对象时,首先会为该视图对象创建一个ViewRootImpl对象,并且将视图对象、ViewRootImpl对象、视图布局参数分别保存到窗口管理器WindowManagerImpl得mViews、mRoots、mParams数组中,如下图所示:
最后通过ViewRootImpl对象来完成视图的显示过程。
ViewRootImpl构造过程
frameworks\base\core\java\android\view\ViewRootImpl.java
public ViewRootImpl(Context context) {
...
①getWindowSession(context.getMainLooper());
mThread = Thread.currentThread();
mLocation = new WindowLeaked(null);
mLocation.fillInStackTrace();
mWidth = -1;
mHeight = -1;
mDirty = new Rect();
mTempRect = new Rect();
mVisRect = new Rect();
mWinFrame = new Rect();
②mWindow = new W(this);
mTargetSdkVersion = context.getApplicationInfo().targetSdkVersion;
mInputMethodCallback = new InputMethodCallback(this);
mViewVisibility = View.GONE;
mTransparentRegion = new Region();
mPreviousTransparentRegion = new Region();
mFirst = true; // true for the first time the view is added
mAdded = false;
mAccessibilityManager = AccessibilityManager.getInstance(context);
mAccessibilityInteractionConnectionManager =
new AccessibilityInteractionConnectionManager();
mAccessibilityManager.addAccessibilityStateChangeListener(
mAccessibilityInteractionConnectionManager);
③mAttachInfo = new View.AttachInfo(sWindowSession, mWindow, this, mHandler, this);
mViewConfiguration = ViewConfiguration.get(context);
mDensity = context.getResources().getDisplayMetrics().densityDpi;
mFallbackEventHandler = PolicyManager.makeNewFallbackEventHandler(context);
mProfileRendering = Boolean.parseBoolean(
SystemProperties.get(PROPERTY_PROFILE_RENDERING, "false"));
④mChoreographer = Choreographer.getInstance();
PowerManager powerManager = (PowerManager) context.getSystemService(Context.POWER_SERVICE);
mAttachInfo.mScreenOn = powerManager.isScreenOn();
loadSystemProperties();
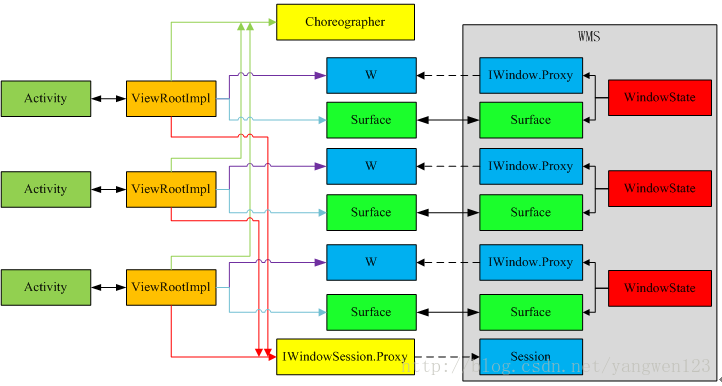
}在ViewRootImpl的构造函数中初始化了一些成员变量,ViewRootImpl创建了以下几个主要对象:
1) 通过getWindowSession(context.getMainLooper())得到IWindowSession的代理对象,该对象用于和WMS通信。
2) 创建了一个W本地Binder对象,用于WMS通知应用程序进程。
3) 采用单例模式创建了一个Choreographer对象,用于统一调度窗口绘图。
4) 创建ViewRootHandler对象,用于处理当前视图消息。
5) 构造一个AttachInfo对象;
6) 创建Surface对象,用于绘制当前视图,当然该Surface对象的真正创建是由WMS来完成的,只不过是WMS传递给应用程序进程的。
private final Surface mSurface = new Surface();
final ViewRootHandler mHandler = new ViewRootHandler();
IWindowSession代理获取过程
frameworks\base\core\java\android\view\ViewRootImpl.java
public static IWindowSession getWindowSession(Looper mainLooper) {
	synchronized (mStaticInit) {
		if (!mInitialized) {
			try {
				//获取输入法管理器
				InputMethodManager imm = InputMethodManager.getInstance(mainLooper);
				//获取窗口管理器
				IWindowManager windowManager = Display.getWindowManager();
				//得到IWindowSession代理对象
				sWindowSession = windowManager.openSession(imm.getClient(), imm.getInputContext());
				float animatorScale = windowManager.getAnimationScale(2);
				ValueAnimator.setDurationScale(animatorScale);
				mInitialized = true;
			} catch (RemoteException e) {
			}
		}
		return sWindowSession;
	}
}
以上函数通过WMS的openSession函数创建应用程序与WMS之间的连接通道,即获取IWindowSession代理对象,并将该代理对象保存到ViewRootImpl的静态成员变量sWindowSession中
static IWindowSession sWindowSession;因此在应用程序进程中有且只有一个IWindowSession代理对象。
frameworks\base\services\java\com\android\server\wm\WindowManagerService.java
public IWindowSession openSession(IInputMethodClient client,
		IInputContext inputContext) {
	if (client == null) throw new IllegalArgumentException("null client");
	if (inputContext == null) throw new IllegalArgumentException("null inputContext");
	Session session = new Session(this, client, inputContext);
	return session;
}
在WMS服务端构造了一个Session实例对象。

AttachInfo构造过程
frameworks\base\core\java\android\view\ View.java
AttachInfo(IWindowSession session, IWindow window,
		ViewRootImpl viewRootImpl, Handler handler, Callbacks effectPlayer) {
	mSession = session;//IWindowSession代理对象,用于与WMS通信
	mWindow = window;//W对象
	mWindowToken = window.asBinder();//W本地Binder对象
	mViewRootImpl = viewRootImpl;//ViewRootImpl实例
	mHandler = handler;//ViewRootHandler对象
	mRootCallbacks = effectPlayer;//ViewRootImpl实例
}
创建Choreographer对象
在Android Project Butter分析中介绍了Android4.1引入VSYNC、Triple Buffer和Choreographer来改善Android先天存在的UI流畅性差问题,有关Choreographer的实现过程请参看Android系统Choreographer机制实现过程。
视图View添加过程
窗口管理器WindowManagerImpl为当前添加的窗口创建好各种对象后,调用ViewRootImpl的setView函数向WMS服务添加一个窗口对象。
public void setView(View view, WindowManager.LayoutParams attrs, View panelParentView) {
synchronized (this) {
if (mView == null) {
//将DecorView保存到ViewRootImpl的成员变量mView中
mView = view;
mFallbackEventHandler.setView(view);
mWindowAttributes.copyFrom(attrs);
attrs = mWindowAttributes;
mClientWindowLayoutFlags = attrs.flags;
setAccessibilityFocus(null, null);
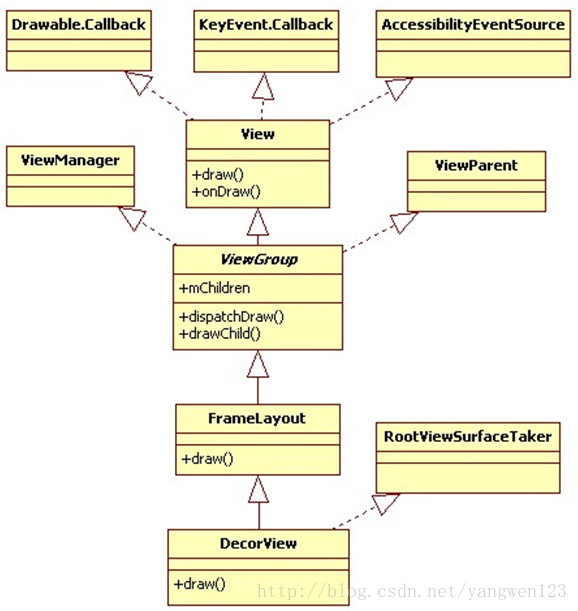
//DecorView实现了RootViewSurfaceTaker接口
if (view instanceof RootViewSurfaceTaker) {
mSurfaceHolderCallback =
((RootViewSurfaceTaker)view).willYouTakeTheSurface();
if (mSurfaceHolderCallback != null) {
mSurfaceHolder = new TakenSurfaceHolder();
mSurfaceHolder.setFormat(PixelFormat.UNKNOWN);
}
}
...
//同时将DecorView保存到mAttachInfo中
mAttachInfo.mRootView = view;
mAttachInfo.mScalingRequired = mTranslator != null;
mAttachInfo.mApplicationScale = mTranslator == null ? 1.0f : mTranslator.applicationScale;
if (panelParentView != null) {
mAttachInfo.mPanelParentWindowToken
= panelParentView.getApplicationWindowToken();
}
...
//在添加窗口前进行UI布局
①requestLayout();
if ((mWindowAttributes.inputFeatures& WindowManager.LayoutParams.INPUT_FEATURE_NO_INPUT_CHANNEL) == 0) {
mInputChannel = new InputChannel();
}
try {
mOrigWindowType = mWindowAttributes.type;
mAttachInfo.mRecomputeGlobalAttributes = true;
collectViewAttributes();
//将窗口添加到WMS服务中,mWindow为W本地Binder对象,通过Binder传输到WMS服务端后,变为IWindow代理对象
②res = sWindowSession.add(mWindow, mSeq, mWindowAttributes,
getHostVisibility(), mAttachInfo.mContentInsets,
mInputChannel);
} catch (RemoteException e) {
...
}
...
//建立窗口消息通道
if (view instanceof RootViewSurfaceTaker) {
mInputQueueCallback =
((RootViewSurfaceTaker)view).willYouTakeTheInputQueue();
}
if (mInputChannel != null) {
if (mInputQueueCallback != null) {
mInputQueue = new InputQueue(mInputChannel);
mInputQueueCallback.onInputQueueCreated(mInputQueue);
} else {
mInputEventReceiver = new WindowInputEventReceiver(mInputChannel,Looper.myLooper());
}
}
...
}
}
}
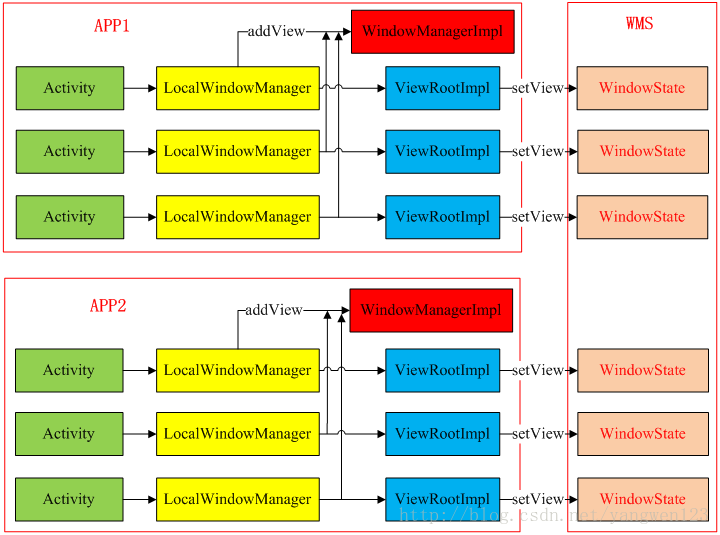
通过前面的分析可以知道,用户自定义的UI作为一个子View被添加到DecorView中,然后将顶级视图DecorView添加到应用程序进程的窗口管理器中,窗口管理器首先为当前添加的View创建一个ViewRootImpl对象、一个布局参数对象ViewGroup.LayoutParams,然后将这三个对象分别保存到当前应用程序进程的窗口管理器WindowManagerImpl中,最后通过ViewRootImpl对象将当前视图对象注册到WMS服务中。
ViewRootImpl的setView函数向WMS服务添加一个窗口对象过程:
1) requestLayout()在应用程序进程中进行窗口UI布局;
2) WindowSession.add()向WMS服务注册一个窗口对象;
3) 注册应用程序进程端的消息接收通道;
窗口UI布局过程
frameworks\base\core\java\android\view\ViewRootImpl.java
public void requestLayout() {
	//检查当前线程是否是UI线程
	checkThread();
	//标识当前正在请求UI布局
	mLayoutRequested = true;
	scheduleTraversals();
}
窗口布局过程必须在UI线程中进行,因此该函数首先检查调用requestLayout()函数的线程是否为创建ViewRootImpl对象的线程。然后调用scheduleTraversals()函数启动Choreographer的Callback遍历过程。
void scheduleTraversals() {
	if (!mTraversalScheduled) {
		mTraversalScheduled = true;
		//暂停UI线程消息队列对同步消息的处理
		mTraversalBarrier = mHandler.getLooper().postSyncBarrier();
		//向Choreographer注册一个类型为CALLBACK_TRAVERSAL的回调,用于处理UI绘制
		mChoreographer.postCallback(
				Choreographer.CALLBACK_TRAVERSAL, mTraversalRunnable, null);
		//向Choreographer注册一个类型为CALLBACK_INPUT的回调,用于处理输入事件
		scheduleConsumeBatchedInput();
	}
}
关于Choreographer的postCallback()用法在前面进行了详细的介绍,当Vsync事件到来时,mTraversalRunnable对象的run()函数将被调用。
frameworks\base\core\java\android\view\ViewRootImpl.java
final TraversalRunnable mTraversalRunnable = new TraversalRunnable();
final class TraversalRunnable implements Runnable {
        @Override
        public void run() {
            doTraversal();
        }
}
mTraversalRunnable对象的类型为TraversalRunnable,该类实现了Runnable接口,在其run()函数中调用了doTraversal()函数来完成窗口布局。
void doTraversal() {
	if (mTraversalScheduled) {
		mTraversalScheduled = false;
		mHandler.getLooper().removeSyncBarrier(mTraversalBarrier);
		if (mProfile) {
			Debug.startMethodTracing("ViewAncestor");
		}
		Trace.traceBegin(Trace.TRACE_TAG_VIEW, "performTraversals");
		try {
			performTraversals();
		} finally {
			Trace.traceEnd(Trace.TRACE_TAG_VIEW);
		}
		if (mProfile) {
			Debug.stopMethodTracing();
			mProfile = false;
		}
	}
}
performTraversals函数相当复杂,其主要实现以下几个重要步骤:
1.执行窗口测量;
2.执行窗口注册;
3.执行窗口布局;
4.执行窗口绘图;
private void performTraversals() {
	// cache mView since it is used so much below...
	final View host = mView;
	if (host == null || !mAdded)
		return;
	mWillDrawSoon = true;
	boolean windowSizeMayChange = false;
	boolean newSurface = false;
	boolean surfaceChanged = false;
	WindowManager.LayoutParams lp = mWindowAttributes;
	int desiredWindowWidth;
	int desiredWindowHeight;
	final View.AttachInfo attachInfo = mAttachInfo;
	final int viewVisibility = getHostVisibility();
	boolean viewVisibilityChanged = mViewVisibility != viewVisibility
			|| mNewSurfaceNeeded;
	WindowManager.LayoutParams params = null;
	if (mWindowAttributesChanged) {
		mWindowAttributesChanged = false;
		surfaceChanged = true;
		params = lp;
	}
	...
	/****************执行窗口测量******************/
	boolean layoutRequested = mLayoutRequested && !mStopped;
	if (layoutRequested) {
		...
		// Ask host how big it wants to be
		windowSizeMayChange |= measureHierarchy(host, lp, res,
				desiredWindowWidth, desiredWindowHeight);
	}
	...
	/****************向WMS服务添加窗口******************/
	if (mFirst || windowShouldResize || insetsChanged ||
			viewVisibilityChanged || params != null) {
		...
		try {
			final int surfaceGenerationId = mSurface.getGenerationId();
			relayoutResult = relayoutWindow(params, viewVisibility, insetsPending);
			...
		} catch (RemoteException e) {
		}
		...
		if (!mStopped) {
			boolean focusChangedDueToTouchMode = ensureTouchModeLocally(
					(relayoutResult&WindowManagerImpl.RELAYOUT_RES_IN_TOUCH_MODE) != 0);
			if (focusChangedDueToTouchMode || mWidth != host.getMeasuredWidth()
					|| mHeight != host.getMeasuredHeight() || contentInsetsChanged) {
				...
				 // Ask host how big it wants to be
				performMeasure(childWidthMeasureSpec, childHeightMeasureSpec);
				...
			}
		}
	}
	/****************执行窗口布局******************/
	final boolean didLayout = layoutRequested && !mStopped;
	boolean triggerGlobalLayoutListener = didLayout
			|| attachInfo.mRecomputeGlobalAttributes;
	if (didLayout) {
		performLayout();
		...
	}
	...
	/****************查找窗口焦点******************/
	boolean skipDraw = false;
	if (mFirst) {
		// handle first focus request
		if (DEBUG_INPUT_RESIZE) Log.v(TAG, "First: mView.hasFocus()="
				+ mView.hasFocus());
		if (mView != null) {
			if (!mView.hasFocus()) {
				mView.requestFocus(View.FOCUS_FORWARD);
				mFocusedView = mRealFocusedView = mView.findFocus();
				if (DEBUG_INPUT_RESIZE) Log.v(TAG, "First: requested focused view="
						+ mFocusedView);
			} else {
				mRealFocusedView = mView.findFocus();
				if (DEBUG_INPUT_RESIZE) Log.v(TAG, "First: existing focused view="
						+ mRealFocusedView);
			}
		}
		if ((relayoutResult&WindowManagerImpl.RELAYOUT_RES_ANIMATING) != 0) {
			// The first time we relayout the window, if the system is
			// doing window animations, we want to hold of on any future
			// draws until the animation is done.
			mWindowsAnimating = true;
		}
	} else if (mWindowsAnimating) {
		skipDraw = true;
	}
	/****************执行窗口绘制******************/
	mFirst = false;
	mWillDrawSoon = false;
	mNewSurfaceNeeded = false;
	mViewVisibility = viewVisibility;
	...
	boolean cancelDraw = attachInfo.mTreeObserver.dispatchOnPreDraw() ||
			viewVisibility != View.VISIBLE;
	if (!cancelDraw && !newSurface) {
		if (!skipDraw || mReportNextDraw) {
			if (mPendingTransitions != null && mPendingTransitions.size() > 0) {
				for (int i = 0; i < mPendingTransitions.size(); ++i) {
					mPendingTransitions.get(i).startChangingAnimations();
				}
				mPendingTransitions.clear();
			}
			performDraw();
		}
	} else {
		if (viewVisibility == View.VISIBLE) {
			// Try again
			scheduleTraversals();
		} else if (mPendingTransitions != null && mPendingTransitions.size() > 0) {
			for (int i = 0; i < mPendingTransitions.size(); ++i) {
				mPendingTransitions.get(i).endChangingAnimations();
			}
			mPendingTransitions.clear();
		}
	}
}
performMeasure
frameworks\base\core\java\android\view\ViewRootImpl.java
private void performMeasure(int childWidthMeasureSpec, int childHeightMeasureSpec) {
 Trace.traceBegin(Trace.TRACE_TAG_VIEW, "measure");
 try {
  mView.measure(childWidthMeasureSpec, childHeightMeasureSpec);
 } finally {
  Trace.traceEnd(Trace.TRACE_TAG_VIEW);
 }
}
relayoutWindow
frameworks\base\core\java\android\view\ViewRootImpl.java
private int relayoutWindow(WindowManager.LayoutParams params, int viewVisibility,
		boolean insetsPending) throws RemoteException {
	...
	int relayoutResult = sWindowSession.relayout(
			mWindow, mSeq, params,
			(int) (mView.getMeasuredWidth() * appScale + 0.5f),
			(int) (mView.getMeasuredHeight() * appScale + 0.5f),
			viewVisibility, insetsPending ? WindowManagerImpl.RELAYOUT_INSETS_PENDING : 0,
			mWinFrame, mPendingContentInsets, mPendingVisibleInsets,
			mPendingConfiguration, mSurface);
	...
	return relayoutResult;
}
这里通过前面获取的IWindowSession代理对象请求WMS服务执行窗口布局,mSurface是ViewRootImpl的成员变量
private final Surface mSurface = new Surface();frameworks\base\core\java\android\view\ Surface.java
public Surface() {
	checkHeadless();
	if (DEBUG_RELEASE) {
		mCreationStack = new Exception();
	}
	mCanvas = new CompatibleCanvas();
}
该Surface构造函数仅仅创建了一个CompatibleCanvas对象,并没有对该Surface进程native层的初始化,到此我们知道应用程序进程为每个窗口对象都创建了一个Surface对象。并且将该Surface通过跨进程方式传输给WMS服务进程,我们知道,在Android系统中,如果一个对象需要在不同进程间传输,必须实现Parcelable接口,Surface类正好实现了Parcelable接口。ViewRootImpl通过IWindowSession接口请求WMS的完整过程如下:
frameworks\base\core\java\android\view\IWindowSession.java$ Proxy
public int relayout(android.view.IWindow window, int seq,
		android.view.WindowManager.LayoutParams attrs, int requestedWidth,
		int requestedHeight, int viewVisibility, int flags,
		android.graphics.Rect outFrame,
		android.graphics.Rect outOverscanInsets,
		android.graphics.Rect outContentInsets,
		android.graphics.Rect outVisibleInsets,
		android.content.res.Configuration outConfig,
		android.view.Surface outSurface) throws android.os.RemoteException {
	android.os.Parcel _data = android.os.Parcel.obtain();
	android.os.Parcel _reply = android.os.Parcel.obtain();
	int _result;
	try {
		_data.writeInterfaceToken(DESCRIPTOR);
		_data.writeStrongBinder((((window != null)) ? (window.asBinder()): (null)));
		_data.writeInt(seq);
		if ((attrs != null)) {
			_data.writeInt(1);
			attrs.writeToParcel(_data, 0);
		} else {
			_data.writeInt(0);
		}
		_data.writeInt(requestedWidth);
		_data.writeInt(requestedHeight);
		_data.writeInt(viewVisibility);
		_data.writeInt(flags);
		mRemote.transact(Stub.TRANSACTION_relayout, _data, _reply, 0);
		_reply.readException();
		_result = _reply.readInt();
		if ((0 != _reply.readInt())) {
			outFrame.readFromParcel(_reply);
		}
		if ((0 != _reply.readInt())) {
			outOverscanInsets.readFromParcel(_reply);
		}
		if ((0 != _reply.readInt())) {
			outContentInsets.readFromParcel(_reply);
		}
		if ((0 != _reply.readInt())) {
			outVisibleInsets.readFromParcel(_reply);
		}
		if ((0 != _reply.readInt())) {
			outConfig.readFromParcel(_reply);
		}
		if ((0 != _reply.readInt())) {
			outSurface.readFromParcel(_reply);
		}
	} finally {
		_reply.recycle();
		_data.recycle();
	}
	return _result;
}
从该函数的实现可以看出,应用程序进程中创建的Surface对象并没有传递到WMS服务进程,只是读取WMS服务进程返回来的Surface。那么WMS服务进程是如何响应应用程序进程布局请求的呢?
frameworks\base\core\java\android\view\IWindowSession.java$ Stub
public boolean onTransact(int code, android.os.Parcel data,
		android.os.Parcel reply, int flags)throws android.os.RemoteException {
	switch (code) {
	case TRANSACTION_relayout: {
		data.enforceInterface(DESCRIPTOR);
		android.view.IWindow _arg0;
		_arg0 = android.view.IWindow.Stub.asInterface(data.readStrongBinder());
		int _arg1;
		_arg1 = data.readInt();
		android.view.WindowManager.LayoutParams _arg2;
		if ((0 != data.readInt())) {
			_arg2 = android.view.WindowManager.LayoutParams.CREATOR
					.createFromParcel(data);
		} else {
			_arg2 = null;
		}
		int _arg3;
		_arg3 = data.readInt();
		int _arg4;
		_arg4 = data.readInt();
		int _arg5;
		_arg5 = data.readInt();
		int _arg6;
		_arg6 = data.readInt();
		android.graphics.Rect _arg7;
		_arg7 = new android.graphics.Rect();
		android.graphics.Rect _arg8;
		_arg8 = new android.graphics.Rect();
		android.graphics.Rect _arg9;
		_arg9 = new android.graphics.Rect();
		android.graphics.Rect _arg10;
		_arg10 = new android.graphics.Rect();
		android.content.res.Configuration _arg11;
		_arg11 = new android.content.res.Configuration();
		android.view.Surface _arg12;
		_arg12 = new android.view.Surface();
		int _result = this.relayout(_arg0, _arg1, _arg2, _arg3, _arg4,
				_arg5, _arg6, _arg7, _arg8, _arg9, _arg10, _arg11, _arg12);
		reply.writeNoException();
		reply.writeInt(_result);
		if ((_arg7 != null)) {
			reply.writeInt(1);
			_arg7.writeToParcel(reply,
					android.os.Parcelable.PARCELABLE_WRITE_RETURN_VALUE);
		} else {
			reply.writeInt(0);
		}
		if ((_arg8 != null)) {
			reply.writeInt(1);
			_arg8.writeToParcel(reply,
					android.os.Parcelable.PARCELABLE_WRITE_RETURN_VALUE);
		} else {
			reply.writeInt(0);
		}
		if ((_arg9 != null)) {
			reply.writeInt(1);
			_arg9.writeToParcel(reply,
					android.os.Parcelable.PARCELABLE_WRITE_RETURN_VALUE);
		} else {
			reply.writeInt(0);
		}
		if ((_arg10 != null)) {
			reply.writeInt(1);
			_arg10.writeToParcel(reply,
					android.os.Parcelable.PARCELABLE_WRITE_RETURN_VALUE);
		} else {
			reply.writeInt(0);
		}
		if ((_arg11 != null)) {
			reply.writeInt(1);
			_arg11.writeToParcel(reply,
					android.os.Parcelable.PARCELABLE_WRITE_RETURN_VALUE);
		} else {
			reply.writeInt(0);
		}
		if ((_arg12 != null)) {
			reply.writeInt(1);
			_arg12.writeToParcel(reply,
					android.os.Parcelable.PARCELABLE_WRITE_RETURN_VALUE);
		} else {
			reply.writeInt(0);
		}
		return true;
	}
	}
}
该函数可以看出,WMS服务在响应应用程序进程请求添加窗口时,首先在当前进程空间创建一个Surface对象,然后调用Session的relayout()函数进一步完成窗口添加过程,最后将WMS服务中创建的Surface返回给应用程序进程。
到目前为止,在应用程序进程和WMS服务进程分别创建了一个Surface对象,但是他们调用的都是Surface的无参构造函数,在该构造函数中并未真正初始化native层的Surface,那native层的Surface是在那里创建的呢?
frameworks\base\services\java\com\android\server\wm\ Session.java
public int relayout(IWindow window, int seq, WindowManager.LayoutParams attrs,
		int requestedWidth, int requestedHeight, int viewFlags,
		int flags, Rect outFrame, Rect outContentInsets,
		Rect outVisibleInsets, Configuration outConfig, Surface outSurface) {
	int res = mService.relayoutWindow(this, window, seq, attrs,
			requestedWidth, requestedHeight, viewFlags, flags,
			outFrame, outContentInsets, outVisibleInsets,
			outConfig, outSurface);
	return res;
}
frameworks\base\services\java\com\android\server\wm\ WindowManagerService.java
public int relayoutWindow(Session session, IWindow client, int seq,
		WindowManager.LayoutParams attrs, int requestedWidth,
		int requestedHeight, int viewVisibility, int flags,
		Rect outFrame, Rect outContentInsets,
		Rect outVisibleInsets, Configuration outConfig, Surface outSurface) {
	...
	synchronized(mWindowMap) {
		// TODO(cmautner): synchronize on mAnimator or win.mWinAnimator.
		WindowState win = windowForClientLocked(session, client, false);
		if (win == null) {
			return 0;
		}
		...
		if (viewVisibility == View.VISIBLE &&
				(win.mAppToken == null || !win.mAppToken.clientHidden)) {
			...
			try {
				if (!win.mHasSurface) {
					surfaceChanged = true;
				}
				//创建Surface
				Surface surface = winAnimator.createSurfaceLocked();
				if (surface != null) {
					outSurface.copyFrom(surface);
				} else {
					outSurface.release();
				}
			} catch (Exception e) {
				...
			}
			...
		}
		...
	}
	...
}
frameworks\base\services\java\com\android\server\wm\WindowStateAnimator.java
Surface createSurfaceLocked() {
	if (mSurface == null) {
		...
		try {
			...
			if (DEBUG_SURFACE_TRACE) {
				mSurface = new SurfaceTrace(
						mSession.mSurfaceSession, mSession.mPid,
						attrs.getTitle().toString(),
						0, w, h, format, flags);
			} else {
				mSurface = new Surface(
					mSession.mSurfaceSession, mSession.mPid,
					attrs.getTitle().toString(),
					0, w, h, format, flags);
			}
			mWin.mHasSurface = true;
		} catch (Surface.OutOfResourcesException e) {
			...
		}
		Surface.openTransaction();
		...
	}
	return mSurface;
}
Surface创建过程
frameworks\base\core\java\android\view\Surface.java
public Surface(SurfaceSession s,int pid, String name, int display, int w, int h, int format, int flags)
	throws OutOfResourcesException {
	checkHeadless();
	if (DEBUG_RELEASE) {
		mCreationStack = new Exception();
	}
	mCanvas = new CompatibleCanvas();
	init(s,pid,name,display,w,h,format,flags);
	mName = name;
}
frameworks\base\core\jni\ android_view_Surface.cpp
static void Surface_init(
JNIEnv* env, jobject clazz,
jobject session,
jint, jstring jname, jint dpy, jint w, jint h, jint format, jint flags)
{
if (session == NULL) {
doThrowNPE(env);
return;
}
SurfaceComposerClient* client =
(SurfaceComposerClient*)env->GetIntField(session, sso.client);
sp<SurfaceControl> surface;
if (jname == NULL) {
surface = client->createSurface(dpy, w, h, format, flags);
} else {
const jchar* str = env->GetStringCritical(jname, 0);
const String8 name(str, env->GetStringLength(jname));
env->ReleaseStringCritical(jname, str);
surface = client->createSurface(name, dpy, w, h, format, flags);
}
if (surface == 0) {
jniThrowException(env, OutOfResourcesException, NULL);
return;
}
setSurfaceControl(env, clazz, surface);
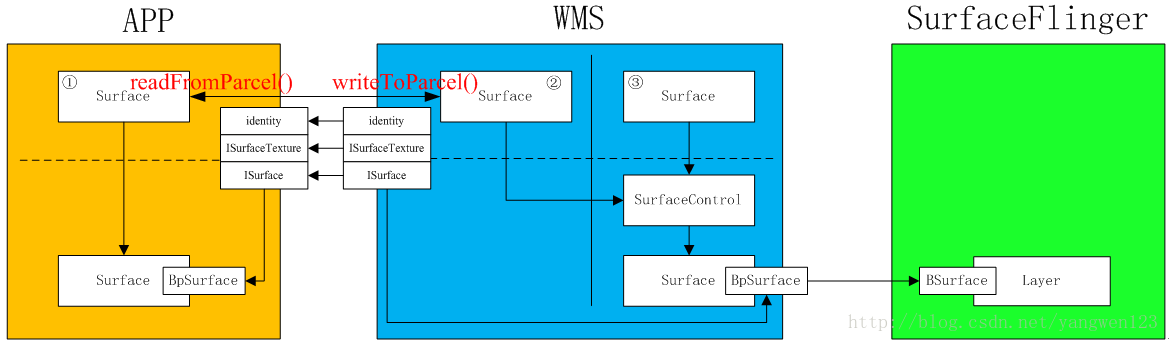
}到此才算真正创建了一个可用于绘图的Surface,从上面的分析我们可以看出,在WMS服务进程端,其实创建了两个Java层的Surface对象,第一个Surface使用了无参构造函数,仅仅构造一个Surface对象而已,而第二个Surface却使用了有参构造函数,参数指定了图象宽高等信息,这个Java层Surface对象还会在native层请求SurfaceFlinger创建一个真正能用于绘制图象的native层Surface。最后通过浅拷贝的方式将第二个Surface复制到第一个Surface中,最后通过writeToParcel方式写回到应用程序进程。
到目前为止,应用程序和WMS一共创建了3个Java层Surface对象,如上图所示,而真正能用于绘图的Surface只有3号,那么3号Surface与2号Surface之间是什么关系呢?outSurface.copyFrom(surface)
frameworks\base\core\jni\ android_view_Surface.cpp
static void Surface_copyFrom(JNIEnv* env, jobject clazz, jobject other)
{
    if (clazz == other)
        return;
    if (other == NULL) {
        doThrowNPE(env);
        return;
    }
	//得到当前Surface所引用的SurfaceControl对象
    const sp<SurfaceControl>& surface = getSurfaceControl(env, clazz);
	//得到源Surface所引用的SurfaceControl对象
    const sp<SurfaceControl>& rhs = getSurfaceControl(env, other);
	//如果它们引用的不是同一个SurfaceControl对象
    if (!SurfaceControl::isSameSurface(surface, rhs)) {
        setSurfaceControl(env, clazz, rhs);
    }
}
2号Surface引用到了3号Surface的SurfaceControl对象后,通过writeToParcel()函数写会到应用程序进程。
frameworks\base\core\jni\ android_view_Surface.cpp
static void Surface_writeToParcel(
        JNIEnv* env, jobject clazz, jobject argParcel, jint flags)
{
    Parcel* parcel = (Parcel*)env->GetIntField(
            argParcel, no.native_parcel);
    if (parcel == NULL) {
        doThrowNPE(env);
        return;
    }
    const sp<SurfaceControl>& control(getSurfaceControl(env, clazz));
    if (control != NULL) {
        SurfaceControl::writeSurfaceToParcel(control, parcel);
    } else {
        sp<Surface> surface(Surface_getSurface(env, clazz));
        if (surface != NULL) {
            Surface::writeToParcel(surface, parcel);
        } else {
            SurfaceControl::writeSurfaceToParcel(NULL, parcel);
        }
    }
    if (flags & PARCELABLE_WRITE_RETURN_VALUE) {
        setSurfaceControl(env, clazz, NULL);
        setSurface(env, clazz, NULL);
    }
}
由于2号Surface引用的SurfaceControl对象不为空,因此这里就将SurfaceControl对象写会给应用程序进程
frameworks\native\libs\gui\ Surface.cpp
status_t SurfaceControl::writeSurfaceToParcel(
const sp<SurfaceControl>& control, Parcel* parcel)
{
sp<ISurface> sur;
uint32_t identity = 0;
if (SurfaceControl::isValid(control)) {
sur = control->mSurface;
identity = control->mIdentity;
}
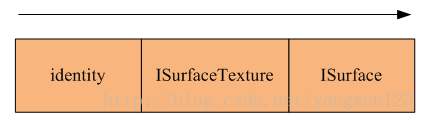
parcel->writeStrongBinder(sur!=0 ? sur->asBinder() : NULL);
parcel->writeStrongBinder(NULL); // NULL ISurfaceTexture in this case.
parcel->writeInt32(identity);
return NO_ERROR;
}
写入Parcel包裹的对象顺序如下:
应用程序进程中的1号Surface通过readFromParcel()函数读取从WMS服务进程写回的Binder对象。
frameworks\base\core\jni\ android_view_Surface.cpp
static void Surface_readFromParcel(
        JNIEnv* env, jobject clazz, jobject argParcel)
{
    Parcel* parcel = (Parcel*)env->GetIntField( argParcel, no.native_parcel);
    if (parcel == NULL) {
        doThrowNPE(env);
        return;
    }
    sp<Surface> sur(Surface::readFromParcel(*parcel));
    setSurface(env, clazz, sur);
}
frameworks\native\libs\gui\ Surface.cpp
sp<Surface> Surface::readFromParcel(const Parcel& data) {
    Mutex::Autolock _l(sCachedSurfacesLock);
    sp<IBinder> binder(data.readStrongBinder());
    sp<Surface> surface = sCachedSurfaces.valueFor(binder).promote();
    if (surface == 0) {
       surface = new Surface(data, binder);
       sCachedSurfaces.add(binder, surface);
    } else {
        // The Surface was found in the cache, but we still should clear any
        // remaining data from the parcel.
        data.readStrongBinder();  // ISurfaceTexture
        data.readInt32();         // identity
    }
    if (surface->mSurface == NULL && surface->getISurfaceTexture() == NULL) {
        surface = 0;
    }
    cleanCachedSurfacesLocked();
    return surface;
}
应用程序进程中的1号Surface按相反顺序读取WMS服务端返回过来的Binder对象等数据,并构造一个native层的Surface对象。
Surface::Surface(const Parcel& parcel, const sp<IBinder>& ref)
    : SurfaceTextureClient()
{
    mSurface = interface_cast<ISurface>(ref);
    sp<IBinder> st_binder(parcel.readStrongBinder());
    sp<ISurfaceTexture> st;
    if (st_binder != NULL) {
        st = interface_cast<ISurfaceTexture>(st_binder);
    } else if (mSurface != NULL) {
        st = mSurface->getSurfaceTexture();
    }
    mIdentity   = parcel.readInt32();
    init(st);
}
每个Activity可以有一个或多个Surface,默认情况下一个Activity只有一个Surface,当Activity中使用SurfaceView时,就存在多个Surface。Activity默认surface是在relayoutWindow过程中由WMS服务创建的,然后回传给应用程序进程,我们知道一个Surface其实就是应用程序端的本地窗口,关于Surface的初始化过程这里就不在介绍。
performLayout
frameworks\base\core\java\android\view\ViewRootImpl.java
private void performLayout() {
	mLayoutRequested = false;
	mScrollMayChange = true;
	final View host = mView;
	if (DEBUG_ORIENTATION || DEBUG_LAYOUT) {
		Log.v(TAG, "Laying out " + host + " to (" +
				host.getMeasuredWidth() + ", " + host.getMeasuredHeight() + ")");
	}
	Trace.traceBegin(Trace.TRACE_TAG_VIEW, "layout");
	try {
		host.layout(0, 0, host.getMeasuredWidth(), host.getMeasuredHeight());
	} finally {
		Trace.traceEnd(Trace.TRACE_TAG_VIEW);
	}
}
performDraw
frameworks\base\core\java\android\view\ ViewRootImpl.java
private void performDraw() {
	if (!mAttachInfo.mScreenOn && !mReportNextDraw) {
		return;
	}
	final boolean fullRedrawNeeded = mFullRedrawNeeded;
	mFullRedrawNeeded = false;
	mIsDrawing = true;
	Trace.traceBegin(Trace.TRACE_TAG_VIEW, "draw");
	try {
		draw(fullRedrawNeeded);
	} finally {
		mIsDrawing = false;
		Trace.traceEnd(Trace.TRACE_TAG_VIEW);
	}
	...
}
private void draw(boolean fullRedrawNeeded) {
	Surface surface = mSurface;
	if (surface == null || !surface.isValid()) {
		return;
	}
	...
	if (!dirty.isEmpty() || mIsAnimating) {
		//使用硬件渲染
		if (attachInfo.mHardwareRenderer != null && attachInfo.mHardwareRenderer.isEnabled()) {
			// Draw with hardware renderer.
			mIsAnimating = false;
			mHardwareYOffset = yoff;
			mResizeAlpha = resizeAlpha;
			mCurrentDirty.set(dirty);
			mCurrentDirty.union(mPreviousDirty);
			mPreviousDirty.set(dirty);
			dirty.setEmpty();
			if (attachInfo.mHardwareRenderer.draw(mView, attachInfo, this,
					animating ? null : mCurrentDirty)) {
				mPreviousDirty.set(0, 0, mWidth, mHeight);
			}
		//使用软件渲染
		} else if (!drawSoftware(surface, attachInfo, yoff, scalingRequired, dirty)) {
			return;
		}
	}
	...
}
窗口添加过程
frameworks\base\services\java\com\android\server\wm\Session.java
public int add(IWindow window, int seq, WindowManager.LayoutParams attrs,
		int viewVisibility, Rect outContentInsets, InputChannel outInputChannel) {
	return mService.addWindow(this, window, seq, attrs, viewVisibility, outContentInsets,
			outInputChannel);
}
frameworks\base\services\java\com\android\server\wm\WindowManagerService.java
public int addWindow(Session session, IWindow client, int seq,
WindowManager.LayoutParams attrs, int viewVisibility,
Rect outContentInsets, InputChannel outInputChannel) {
//client为IWindow的代理对象,是Activity在WMS服务中的唯一标示
int res = mPolicy.checkAddPermission(attrs);
if (res != WindowManagerImpl.ADD_OKAY) {
return res;
}
boolean reportNewConfig = false;
WindowState attachedWindow = null;
WindowState win = null;
long origId;
synchronized(mWindowMap) {
if (mDisplay == null) {
throw new IllegalStateException("Display has not been initialialized");
}
//判断窗口是否已经存在
if (mWindowMap.containsKey(client.asBinder())) {
Slog.w(TAG, "Window " + client + " is already added");
return WindowManagerImpl.ADD_DUPLICATE_ADD;
}
//如果添加的是应用程序窗口
if (attrs.type >= FIRST_SUB_WINDOW && attrs.type <= LAST_SUB_WINDOW) {
//根据attrs.token从mWindowMap中取出应用程序窗口在WMS服务中的描述符WindowState
attachedWindow = windowForClientLocked(null, attrs.token, false);
if (attachedWindow == null) {
Slog.w(TAG, "Attempted to add window with token that is not a window: "
+ attrs.token + ". Aborting.");
return WindowManagerImpl.ADD_BAD_SUBWINDOW_TOKEN;
}
if (attachedWindow.mAttrs.type >= FIRST_SUB_WINDOW
&& attachedWindow.mAttrs.type <= LAST_SUB_WINDOW) {
Slog.w(TAG, "Attempted to add window with token that is a sub-window: "
+ attrs.token + ". Aborting.");
return WindowManagerImpl.ADD_BAD_SUBWINDOW_TOKEN;
}
}
boolean addToken = false;
//根据attrs.token从mWindowMap中取出应用程序窗口在WMS服务中的描述符WindowState
WindowToken token = mTokenMap.get(attrs.token);
if (token == null) {
...
①token = new WindowToken(this, attrs.token, -1, false);
addToken = true;
}
//应用程序窗口
else if (attrs.type >= FIRST_APPLICATION_WINDOW
&& attrs.type <= LAST_APPLICATION_WINDOW) {
AppWindowToken atoken = token.appWindowToken;
...
}
//输入法窗口
else if (attrs.type == TYPE_INPUT_METHOD) {
...
}
//墙纸窗口
else if (attrs.type == TYPE_WALLPAPER) {
...
}
//Dream窗口
else if (attrs.type == TYPE_DREAM) {
...
}
//为Activity窗口创建WindowState对象
②win = new WindowState(this, session, client, token,
attachedWindow, seq, attrs, viewVisibility);
...
if (outInputChannel != null && (attrs.inputFeatures& WindowManager.LayoutParams.INPUT_FEATURE_NO_INPUT_CHANNEL) == 0) {
String name = win.makeInputChannelName();
InputChannel[] inputChannels = InputChannel.openInputChannelPair(name);
win.setInputChannel(inputChannels[0]);
inputChannels[1].transferTo(outInputChannel);
mInputManager.registerInputChannel(win.mInputChannel, win.mInputWindowHandle);
}
...
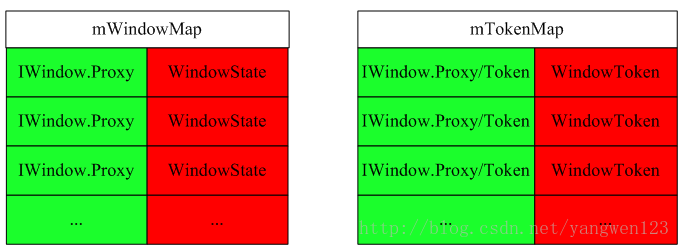
//以键值对<IWindow.Proxy/Token,WindowToken>形式保存到mTokenMap表中
if (addToken) {
③mTokenMap.put(attrs.token, token);
}
④win.attach();
//以键值对<IWindow的代理对象,WindowState>形式保存到mWindowMap表中
⑤mWindowMap.put(client.asBinder(), win);
...
}
...
return res;
}
我们知道当应用程序进程添加一个DecorView到窗口管理器时,会为当前添加的窗口创建ViewRootImpl对象,同时构造了一个W本地Binder对象,无论是窗口视图对象DecorView还是ViewRootImpl对象,都只是存在于应用程序进程中,在添加窗口过程中仅仅将该窗口的W对象传递给WMS服务,经过Binder传输后,到达WMS服务端进程后变为IWindow.Proxy代理对象,因此该函数的参数client的类型为IWindow.Proxy。参数attrs的类型为WindowManager.LayoutParams,在应用程序进程启动Activity时,handleResumeActivity()函数通过WindowManager.LayoutParams l = r.window.getAttributes();来得到应用程序窗口布局参数,由于WindowManager.LayoutParams实现了Parcelable接口,因此WindowManager.LayoutParams对象可以跨进程传输,WMS服务的addWindow函数中的attrs参数就是应用程序进程发送过来的窗口布局参数。在LocalWindowManager的addView函数中为窗口布局参数设置了相应的token,如果是应用程序窗口,则布局参数的token设为W本地Binder对象。如果不是应用程序窗口,同时当前窗口没有父窗口,则设置token为当前窗口的IApplicationToken.Proxy代理对象,否则设置为父窗口的IApplicationToken.Proxy代理对象,由于应用程序和WMS分属于两个不同的进程空间,因此经过Binder传输后,布局参数的令牌attrs.token就转变为IWindow.Proxy或者Token。以上函数首先根据布局参数的token等信息构造一个WindowToken对象,然后在构造一个WindowState对象,并将添加的窗口信息记录到mTokenMap和mWindowMap哈希表中。
在WMS服务端创建了所需对象后,接着调用了WindowState的attach()来进一步完成窗口添加。
frameworks\base\services\java\com\android\server\wm\WindowState.java
void attach() {
	if (WindowManagerService.localLOGV) Slog.v(
		TAG, "Attaching " + this + " token=" + mToken
		+ ", list=" + mToken.windows);
	mSession.windowAddedLocked();
}
frameworks\base\services\java\com\android\server\wm\Session.java
void windowAddedLocked() {
	if (mSurfaceSession == null) {
		mSurfaceSession = new SurfaceSession();
		if (WindowManagerService.SHOW_TRANSACTIONS) Slog.i(
				WindowManagerService.TAG, "  NEW SURFACE SESSION " + mSurfaceSession);
		mService.mSessions.add(this);
	}
	mNumWindow++;//记录对应的某个应用程序添加的窗口数量
}
到此一个新的应用程序窗口就添加完成了。总结一下:
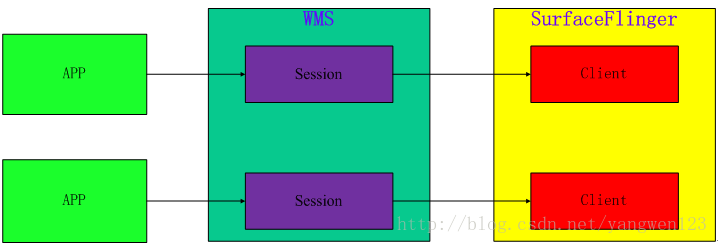
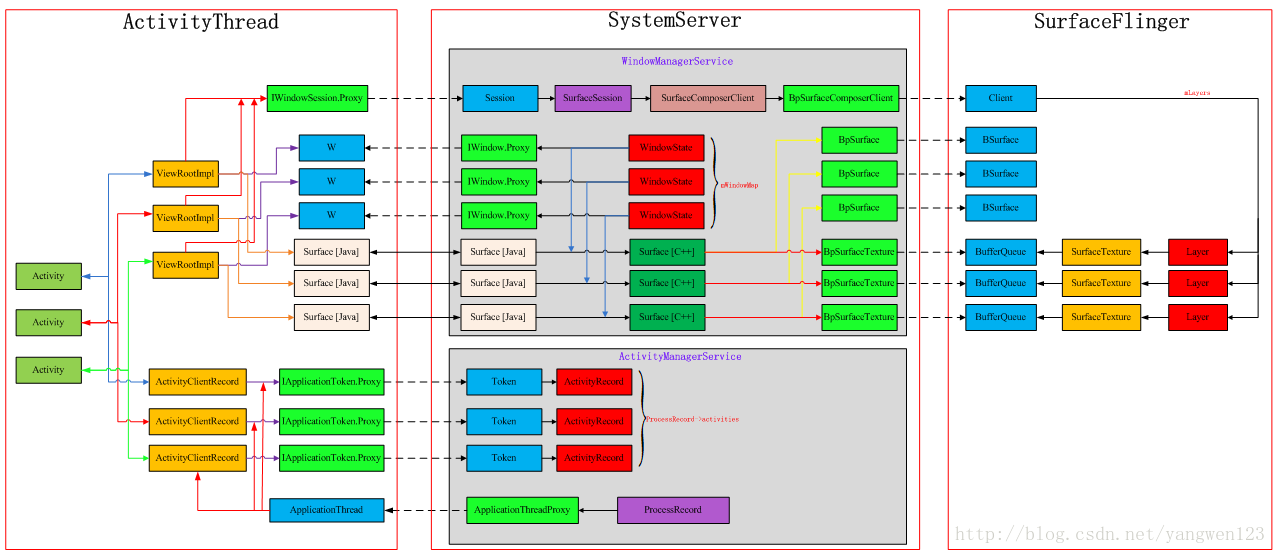
应用程序通过IWindowSession接口请求WMS服务添加一个应用程序窗口,WMS服务首先在自己服务进程为应用程序创建创建一个对应的WindowState描述符,然后保存到成员变量mWindowMap中。如果还没有为应用程序进程创建连接SurfaceFlinger的会话,就接着创建该会话通道SurfaceSession,我们知道,Activity中的视图所使用的画布Surface是在WMS服务进程中创建的,但是该画布所使用的图形buffer确实在SurfaceFlinger进程中分配管理的,而图形的绘制确是在应用程序进程中完成的,所以Activity的显示过程需要三个进程的配合才能完成。应用程序进程只与WMS服务进程交互,并不直接和SurfaceFlinger进程交互,而是由WMS服务进程同SurfaceFlinger进程配合。前面我们介绍了应用程序进程是通过IWindowSession接口与WMS服务进程通信的,那WMS服务是如何与SurfaceFlinger进程通信的呢,这就是windowAddedLocked函数要完成的工作。
在windowAddedLocked函数中使用单例模式创建一个SurfaceSession对象,在构造该对象时,通过JNI在native层创建一个与SurfaceFlinger进程的连接。
frameworks\base\core\java\android\view\SurfaceSession.java
public SurfaceSession() {
	init();
}
该init()函数是一个native函数,其JNI实现如下:
frameworks\base\core\jni\ android_view_Surface.cpp
static void SurfaceSession_init(JNIEnv* env, jobject clazz)
{
    sp<SurfaceComposerClient> client = new SurfaceComposerClient;
    client->incStrong(clazz);
    env->SetIntField(clazz, sso.client, (int)client.get());
}
该函数构造了一个SurfaceComposerClient对象,在第一次强引用该对象时,会请求SurfaceFlinger创建一个专门处理当前应用程序进程请求的Client会话。
每个应用程序进程都持有一个与WMS服务会话通道IWindowSession,而服务端的Session有且只有一个SurfaceSession对象。系统中创建的所有IWindowSession都被记录到WMS服务的mSessions成员变量中,这样WMS就可以知道自己正在处理那些应用程序的请求。到此我们来梳理一下在WMS服务端都创建了那些对象:
1) WindowState对象,是应用程序窗口在WMS服务端的描述符;
2) Session对象,应用程序进程与WMS服务会话通道;
3) SurfaceSession对象,应用程序进程与SurfaceFlinger的会话通道;


 4370
4370


 被折叠的 条评论
为什么被折叠?
被折叠的 条评论
为什么被折叠?
 到【灌水乐园】发言


